A blended approach that combines Pardot Lead scoring and Lead grading can save sales teams time and effort in understanding who the hottest leads are, who to approach first, and how to frame their conversations when doing so.
Scoring and grading are both useful, but without context, they are not very useful for sales. Additionally, having both a score and a grade is hard to understand for sales reps, and can lead to more confusion than benefit.
So, while it is still recommended to use a blended scoring/grading model, we recommend simplifying it by replacing scores and grades with a 1 to 5 star rating systems, where the best leads have 5/5 stars and the worst leads have 1/5 stars.
Today we will show you how to set this up using Salesforce formula fields and display this information simply and visually in Salesforce page layouts, list views and reports (Oh, and if stars are not your thing, you can use any image you want instead!)
What is a Blended Scoring/Grading Model?
First, let’s go over how scoring and grading works in Pardot.
Pardot lead scoring is a way to prioritize leads based on their level of engagement and potential fit for a product or service. Points are assigned when a prospect clicks an email, visits a webpage, fills out a form etc. and the total score indicates how engaged a prospect is with a brand.
Pardot Lead grading looks at what we know about a prospect (ie industry, department, compay size) and determines if they are a good fit to be a potential customer. Grades range from “A” to “D”, so If someone matches our criteria for a good target customer, they would get an “A” grade. If someone does not match at all, tehy would get a “D” grade.
Pardot recommends a blended approach where scoring and grading are used together. By looking at both together, sales can get more context about both how engaged the prospect is, as well as how well they fit a company’s vision of what a good potential target customer may be.
Now that we have our definitions in place, let’s go over how to set up a simple but custom blended scoring/grading model that utilizes a simple 1-5 star rating system to keep things as easy to understand as possible.
Customize and Automate lead scoring and grading
Before diving into the star rating system itself, you will need to make sure your scoring and grading is customized and automated.
Salesforce has some good help articles on this, so follow the links below to get started. Of course you can also contact us if you want our help in setting this up for you.
Customize out of the box Lead Scoring in Pardot:
https://help.salesforce.com/s/articleView?id=sf.pardot_leadqual_scoring.htm&type=5
Automate Lead Grading in Pardot:
https://trailhead.salesforce.com/content/learn/modules/pardot-lead-scoring-and-grading-lightning/use-grading-lightning
Of course, feel free to reach out to us if you want to have the pros do this for you instead 😉
Source your images
Now that we are ready to build, the first step will be to decide on what images to use.
We will use a 5 star system so will require 5 images, one for each star, or rating (1 star, 2 stars etc.). You can either use the default star icon set that comes within Salesforce, or make your own set. You can also use any other image as well, it does not have to be a star.
If you want to use Salesforce’s default set, you can skip this step and move on to the next step. However, if you would like to use your own custom images, simply source the images you want to use and then upload them to Pardot, Salesforce or your website, so that you have them hosted somewhere with a URL to link to.
Create Formula fields based on score and grade
Next, we will create trigger fields. These leads will summarize a score and a grade into a threshold, or range and give a result of 1,2,3,4 or 5.
In Salesforce, create a formula field with a “number” data type. Copy and paste this code:
IF( pi__score__c >200, 5,
IF( pi__score__c >100, 4,
IF( pi__score__c >50, 3,
IF( pi__score__c >0, 2,
1))))
In my example, if the score is bigger than 200, it will result in the number “5”. If the score is 101-199, it will result in the number “4” etc. Of course, feel free to modify those thresholds to whatever works best for you.
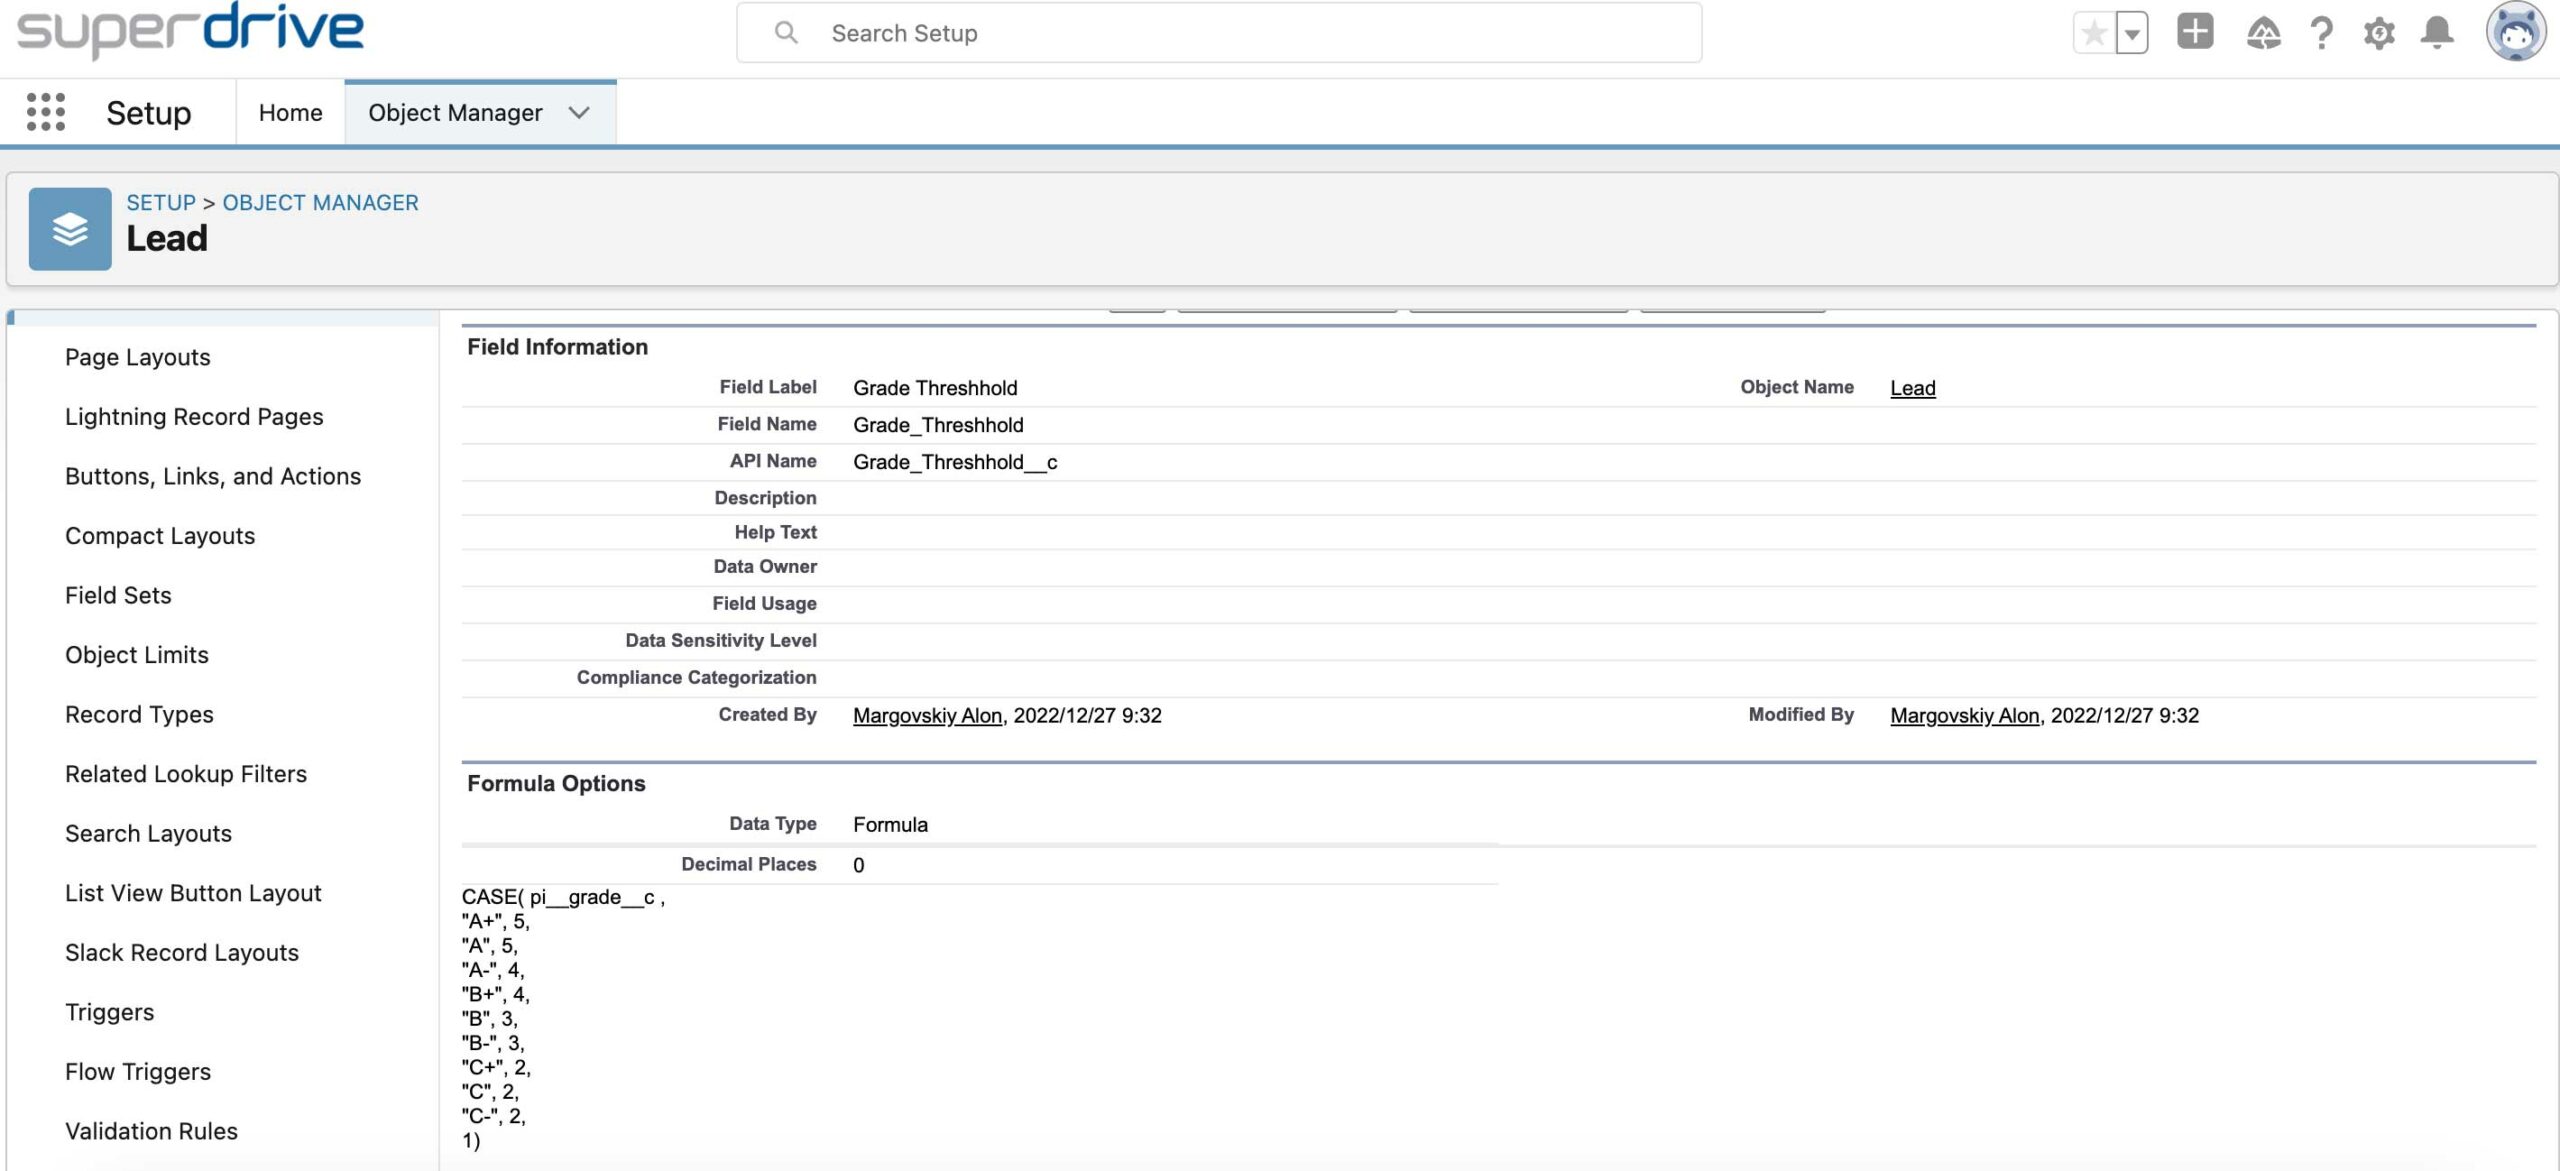
Next, do the same for scoring. Create another formula field with a “number” data type and copy and paste this code:
CASE( pi__grade__c ,
“A+”, 5,
“A”, 5,
“A-“, 4,
“B+”, 4,
“B”, 3,
“B-“, 3,
“C+”, 2,
“C”, 2,
“C-“, 2,
1)
This time, based on each letter grade, a number value between 1 to 5 is spit out.
Here is what my two fields look like: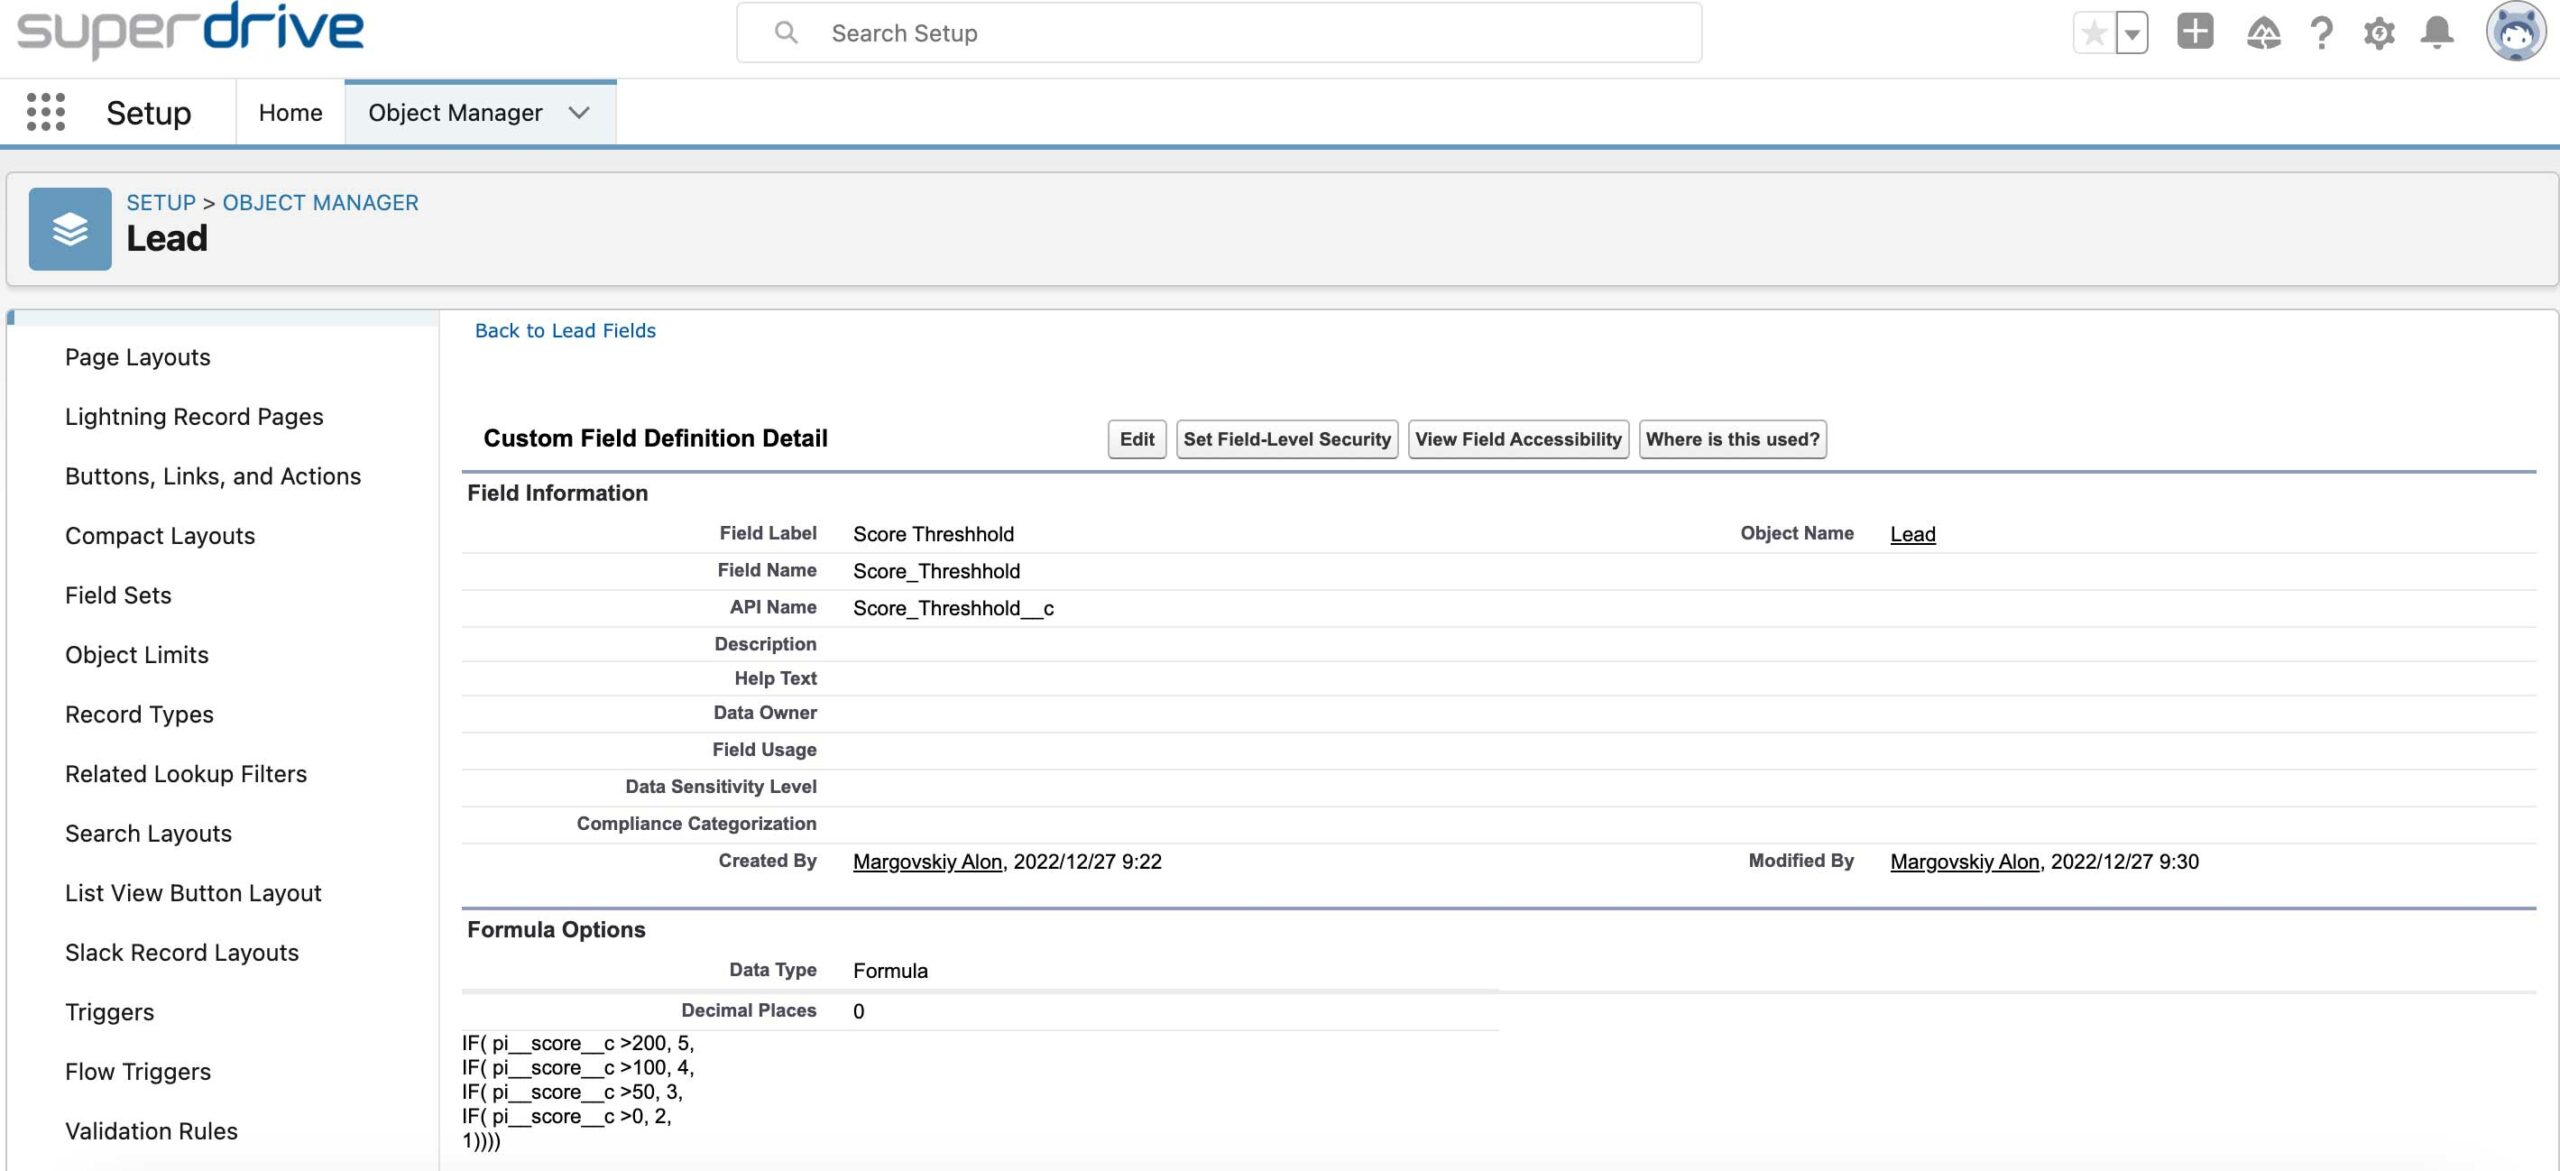
Create Star Ratings Fields
Now that you have your images and your trigger fields, we can create another set of fields that will house our stars and be added to page layouts, reports and list views. These fields will be formula type fields that will display the star images.
5 Star rating scale based on score
To create a field that spits out star images based on score, create a formula field with data type text. If you are using custom images for your stars, copy and paste the following formula:
IF( Score_Threshhold__c =5, IMAGE(“YOUR 5 STAR IMAGE URL HERE“, “5”, 12, 75),
IF( Score_Threshhold__c =4, IMAGE(“YOUR 4 STAR IMAGE URL HERE“, “4”, 12, 75),
IF( Score_Threshhold__c =3, IMAGE(“YOUR 3 STAR IMAGE URL HERE“, “3”, 12, 75),
IF( Score_Threshhold__c =2, IMAGE(“YOUR 2 STAR IMAGE URL HERE“, “2”, 12, 75),
IMAGE(“YOUR 1 STAR IMAGE URL HERE“, “1”, 12, 75)))))
(Replace Score_Threshhold__c with the API name of your score threshold field you created in the previous step)
If you do not want to use custom images and want to use the default stars images from Salesforce, you can use the following formula instead and it will automatically generate the stars for you:
IF( Score_Threshhold__c =5, IMAGE(“/img/samples/stars_500.gif”, “5”, 12, 75),
IF( Score_Threshhold__c =4, IMAGE(“/img/samples/stars_400.gif”, “4”, 12, 75),
IF( Score_Threshhold__c =3, IMAGE(“/img/samples/stars_300.gif”, “3”, 12, 75),
IF( Score_Threshhold__c =2, IMAGE(“/img/samples/stars_200.gif”, “2”, 12, 75),
IMAGE(“/img/samples/stars_100.gif”, “1”, 12, 75)))))
(Replace Score_Threshhold__c with the API name of your score threshold field you created in the previous step)
Here is what my field looks like: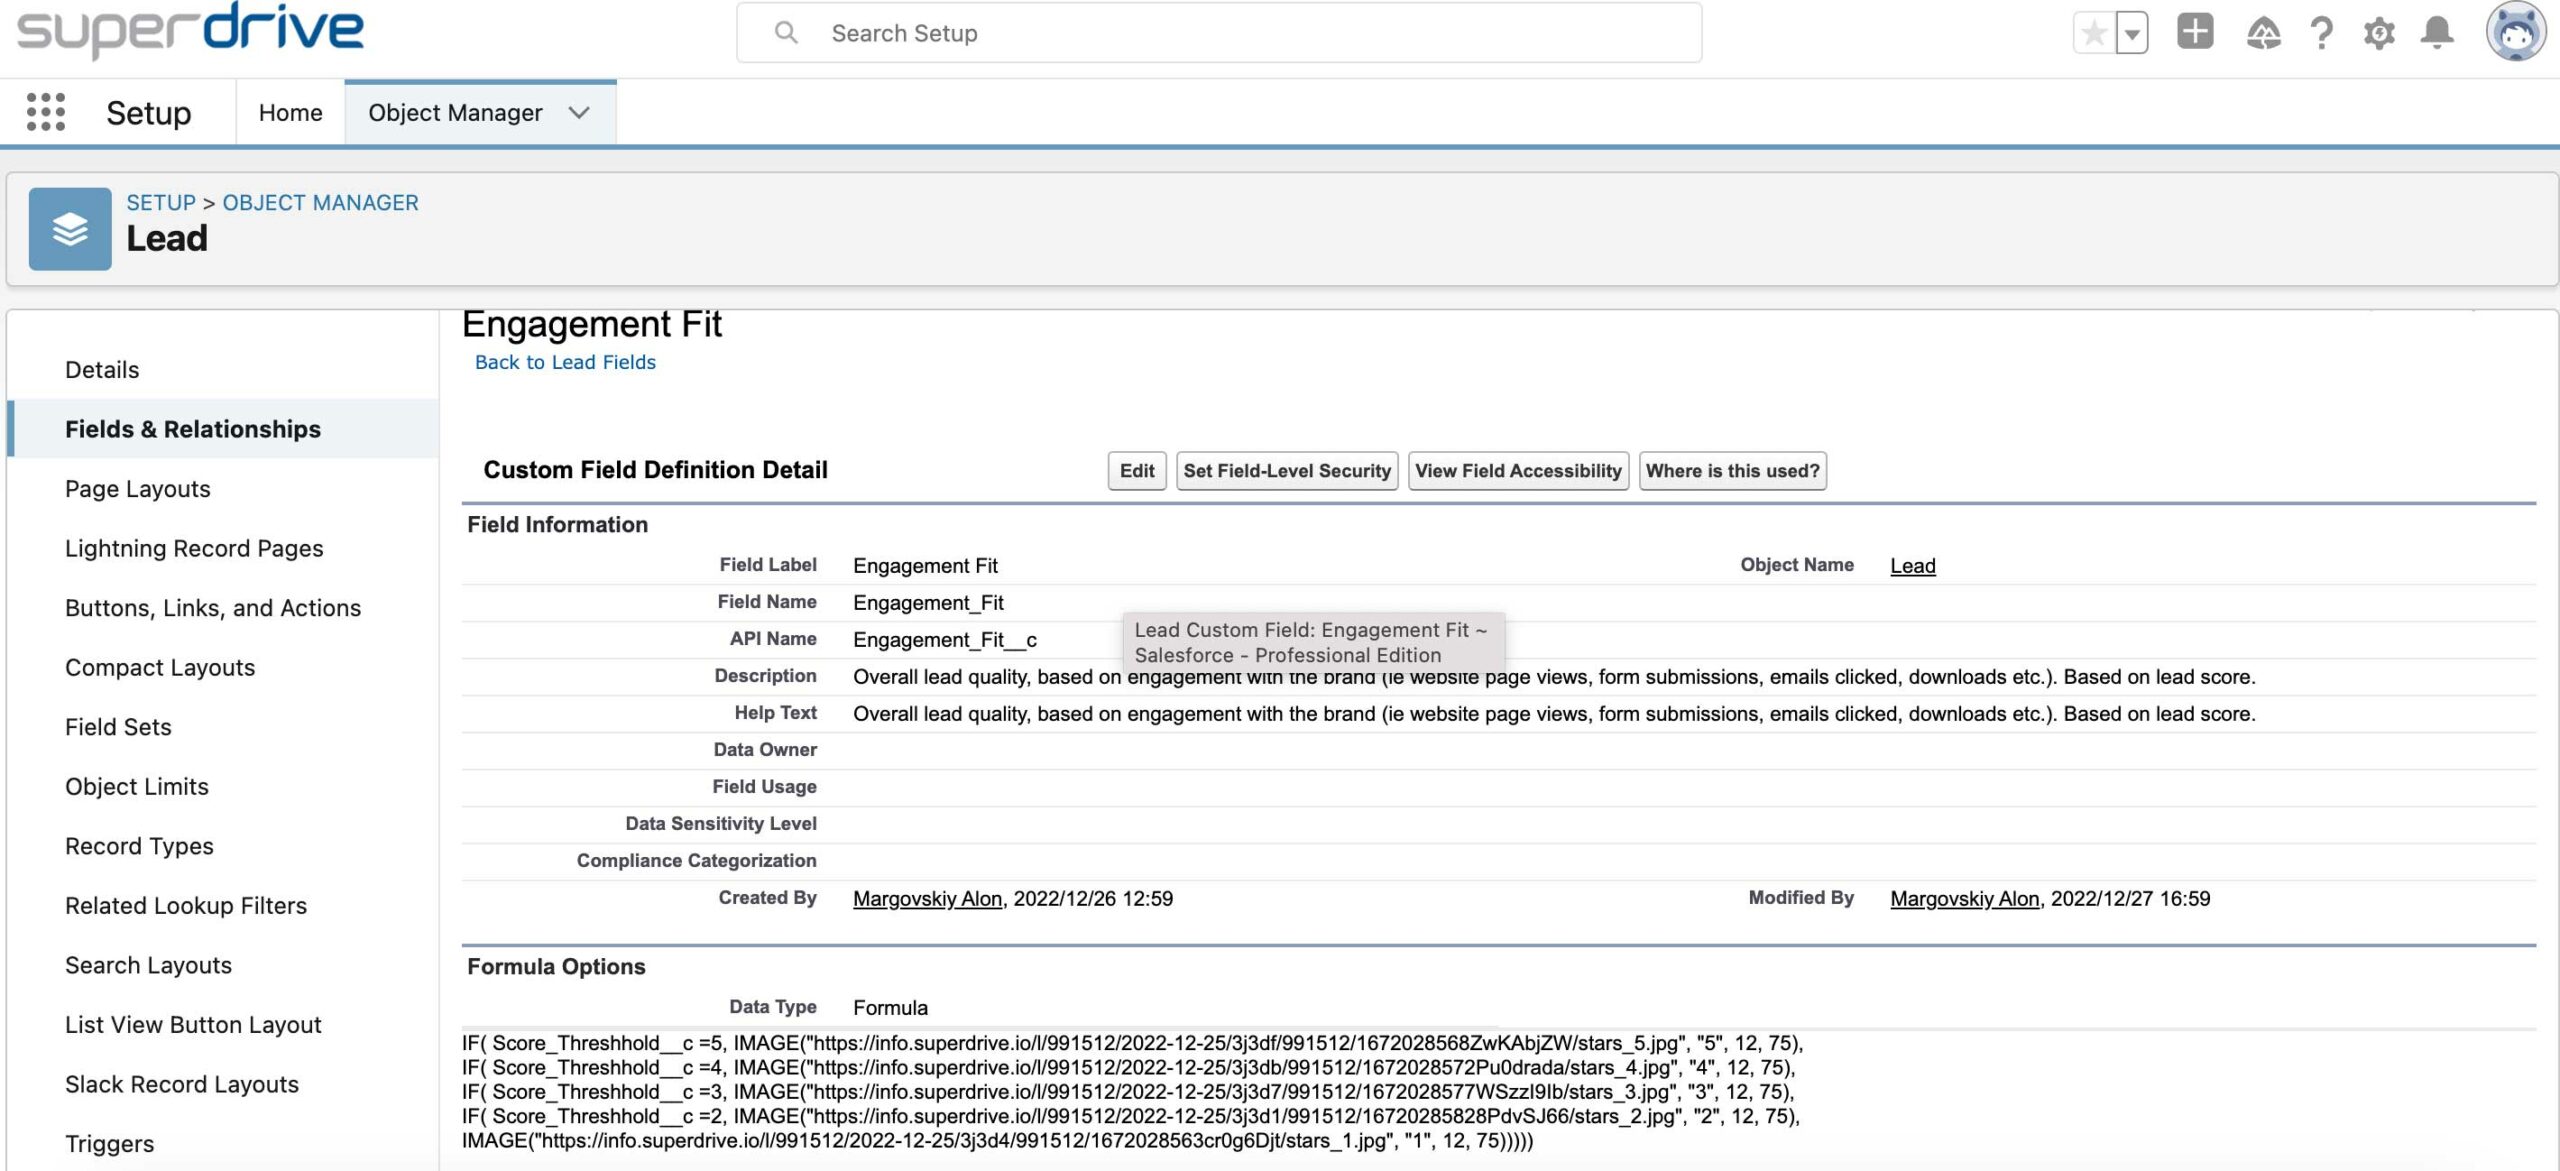
5 Star rating scale based on grade
To create a field that spits out stars based on grade, create a formula field with data type text. If you are using custom images for your stars, copy and paste the following formula:
IF( Grade_Threshhold__c =5, IMAGE(“YOUR 5 STAR IMAGE URL HERE“, “5”, 12, 75),
IF( Grade_Threshhold__c =4, IMAGE(“YOUR 4 STAR IMAGE URL HERE“, “4”, 12, 75),
IF( Grade_Threshhold__c =3, IMAGE(“YOUR 3 STAR IMAGE URL HERE“, “3”, 12, 75),
IF( Grade_Threshhold__c =2, IMAGE(“YOUR 2 STAR IMAGE URL HERE“, “2”, 12, 75),
IMAGE(“YOUR 1 STAR IMAGE URL HERE“, “1”, 12, 75)))))
(Replace Grade_Threshhold__c with the API name of your grade threshold field you created in the previous step)
If you do not want to use custom images and want to use the default stars images from Salesforce, you can use the following formula instead and it will automatically generate the stars for you:
IF( Grade_Threshhold__c =5, IMAGE(“/img/samples/stars_500.gif”, “5”, 12, 75),
IF( Grade_Threshhold__c =4, IMAGE(“/img/samples/stars_400.gif”, “4”, 12, 75),
IF( Grade_Threshhold__c =3, IMAGE(“/img/samples/stars_300.gif”, “3”, 12, 75),
IF( Grade_Threshhold__c =2, IMAGE(“/img/samples/stars_200.gif”, “2”, 12, 75),
IMAGE(“/img/samples/stars_100.gif”, “1”, 12, 75)))))
(Replace Grade_Threshhold__c with the API name of your grade threshold field you created in the previous step)
Here is what my field looks like: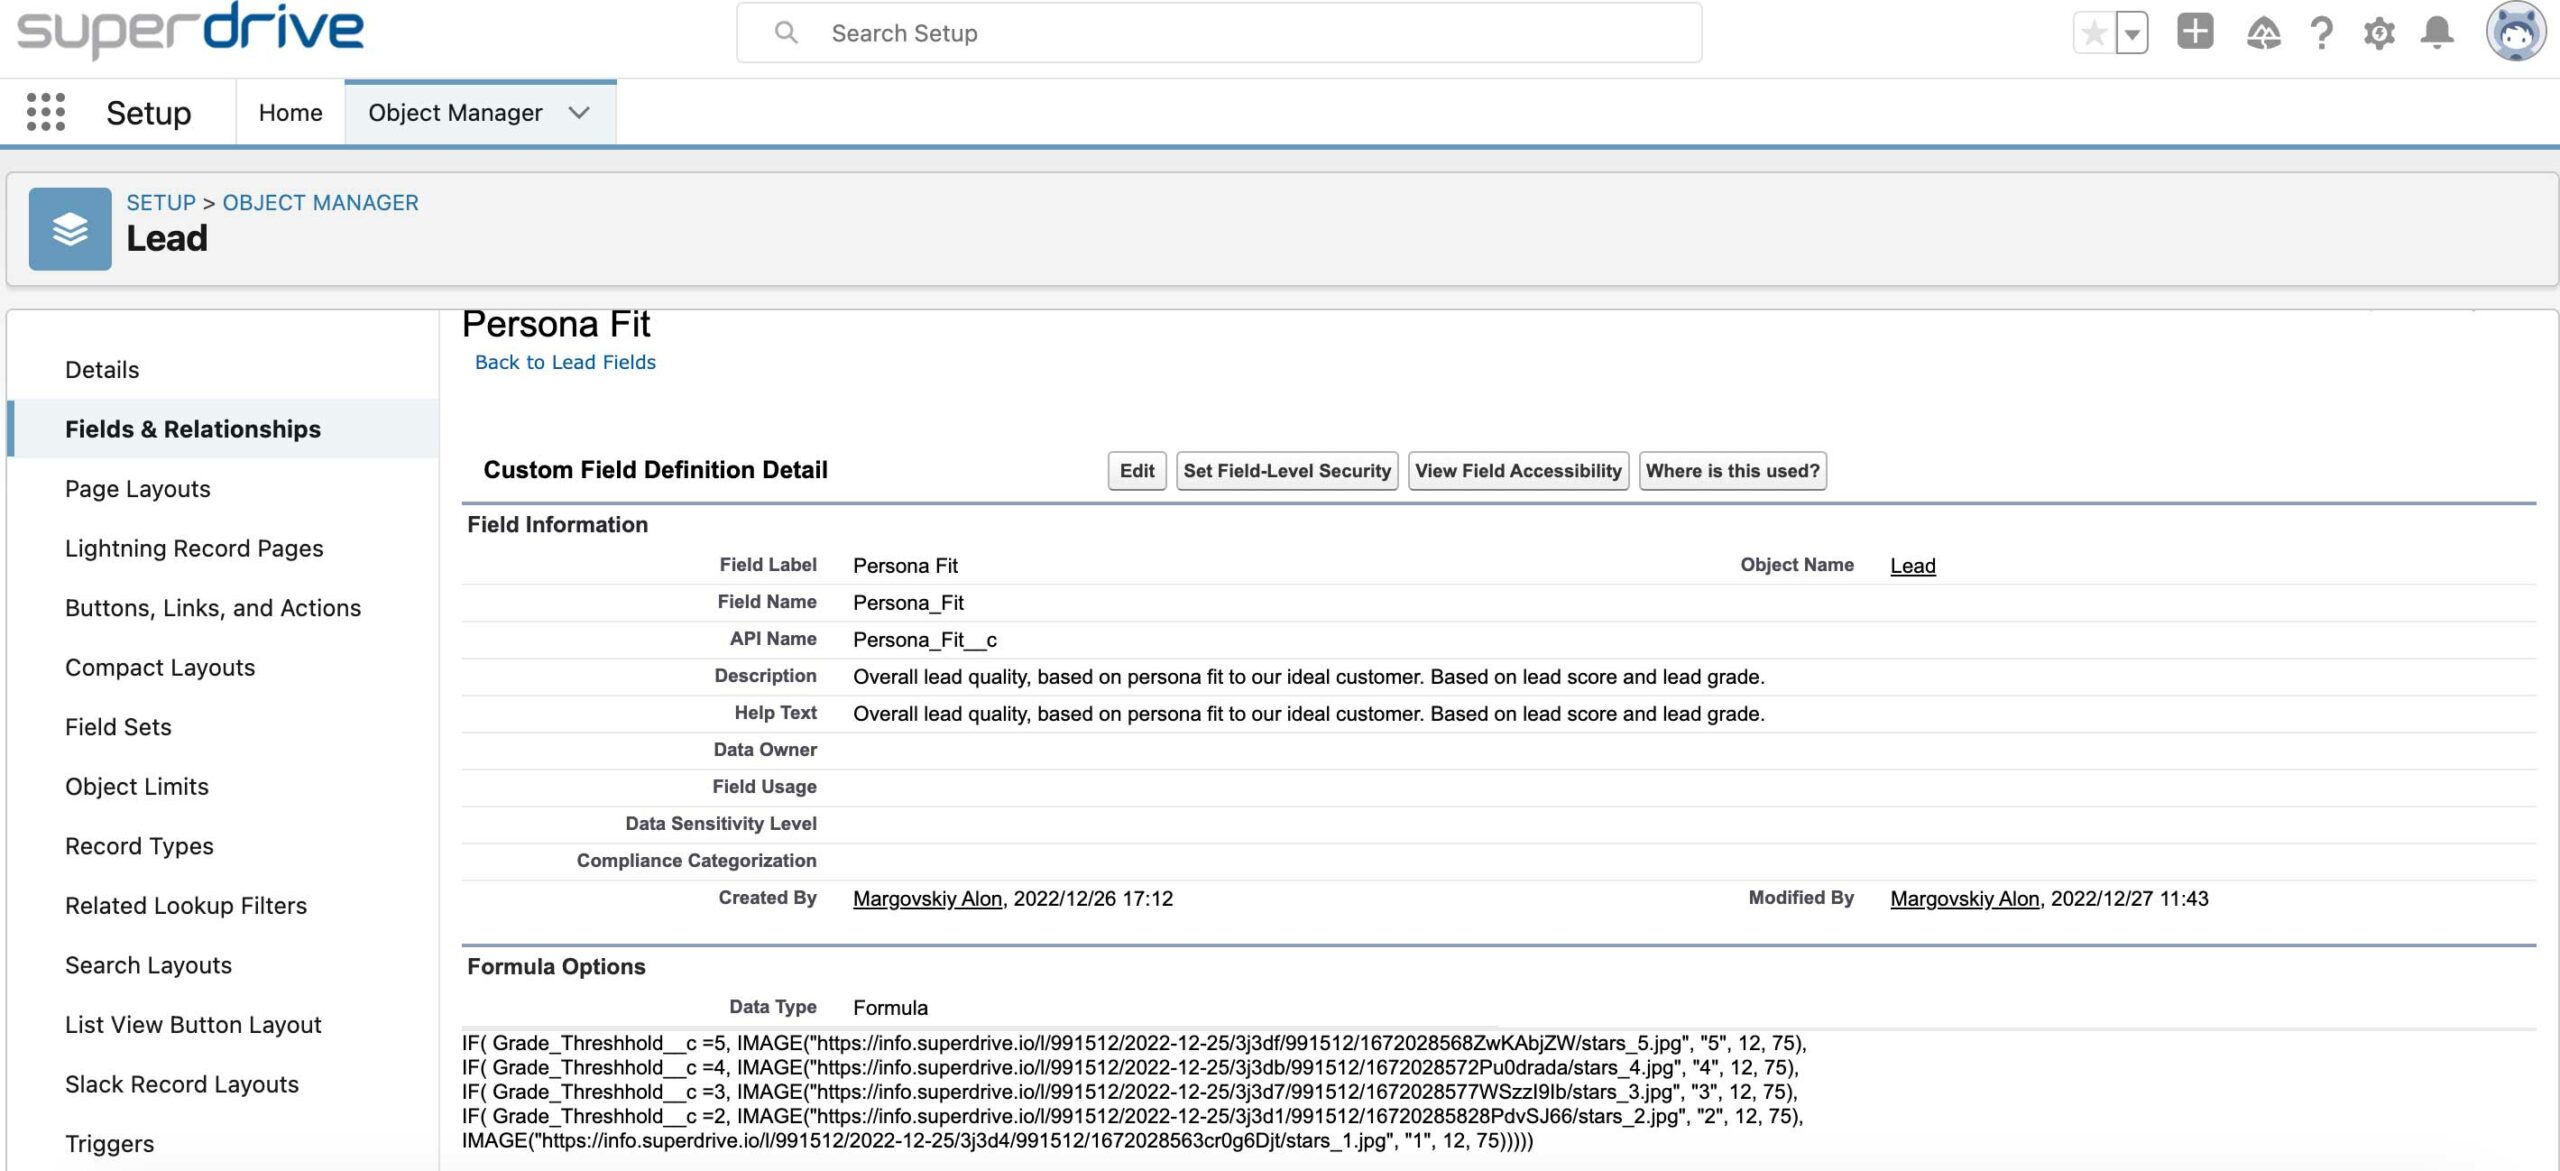
5 Star rating scale based on a BLENDED scoring/grading model
Now we are ready to create our single field that blends score and grade and displays a star rating based on the blended score.
Before creating this field, you will need to decide on what all the combinations of score and grade are for 5, 4, 3, 2 or 1 stars. You can do this in a simple excel or google sheets diagram. Here is what mine looked like: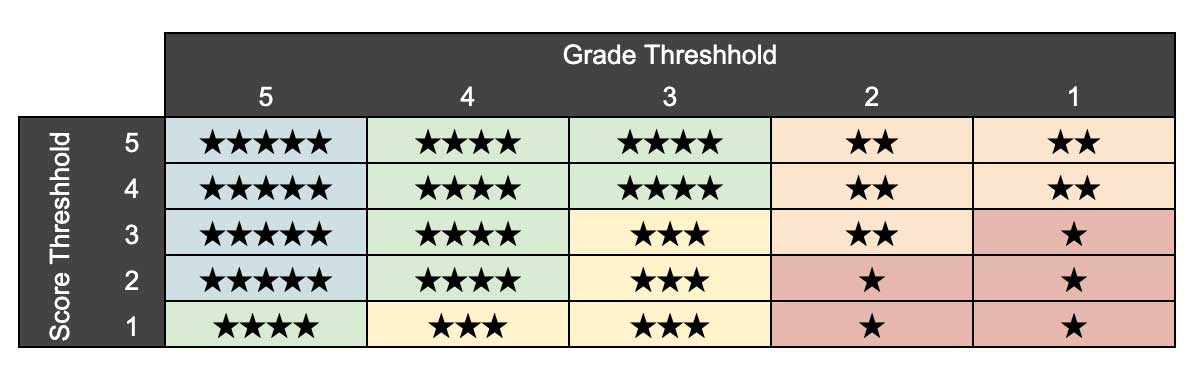 Next, create a formula field with data type text and copy and paste the following formula:
IF( AND (Score_Threshhold__c > 1, Grade_Threshhold__c = 5), IMAGE(“YOUR 5 STAR IMAGE URL HERE“, “5”, 12, 75),
IF( OR (Grade_Threshhold__c = 5, AND (Score_Threshhold__c > 1, Grade_Threshhold__c = 4), AND (Score_Threshhold__c > 3, Grade_Threshhold__c = 3)), IMAGE(“YOUR 4 STAR IMAGE URL HERE“, “4”, 12, 75),
IF( OR (Grade_Threshhold__c = 4, Grade_Threshhold__c = 3), IMAGE(“YOUR 3 STAR IMAGE URL HERE“, “3”, 12, 75),
IF( OR (AND (Grade_Threshhold__c = 2, Score_Threshhold__c > 2), AND (Grade_Threshhold__c = 1, Score_Threshhold__c > 3)), IMAGE(“YOUR 2 STAR IMAGE URL HERE“, “2”, 12, 75),
IMAGE(“YOUR 1 STAR IMAGE URL HERE“, “1”, 12, 75)))))
(Replace Grade_Threshhold__c with the API name of your grade threshold field you created in the previous step)
If you do not want to use custom images and want to use the default stars images from Salesforce, you can use the following formula instead and it will automatically generate the stars for you:
IF( AND (Score_Threshhold__c > 1, Grade_Threshhold__c = 5), IMAGE(“/img/samples/stars_500.gif“, “5”, 12, 75),
IF( OR (Grade_Threshhold__c = 5, AND (Score_Threshhold__c > 1, Grade_Threshhold__c = 4), AND (Score_Threshhold__c > 3, Grade_Threshhold__c = 3)), IMAGE(“/img/samples/stars_400.gif“, “4”, 12, 75),
IF( OR (Grade_Threshhold__c = 4, Grade_Threshhold__c = 3), IMAGE(“/img/samples/stars_300.gif“, “3”, 12, 75),
IF( OR (AND (Grade_Threshhold__c = 2, Score_Threshhold__c > 2), AND (Grade_Threshhold__c = 1, Score_Threshhold__c > 3)), IMAGE(“/img/samples/stars_200.gif“, “2”, 12, 75),
IMAGE(“/img/samples/stars_100.gif“, “1”, 12, 75)))))
Here is what mine looks like: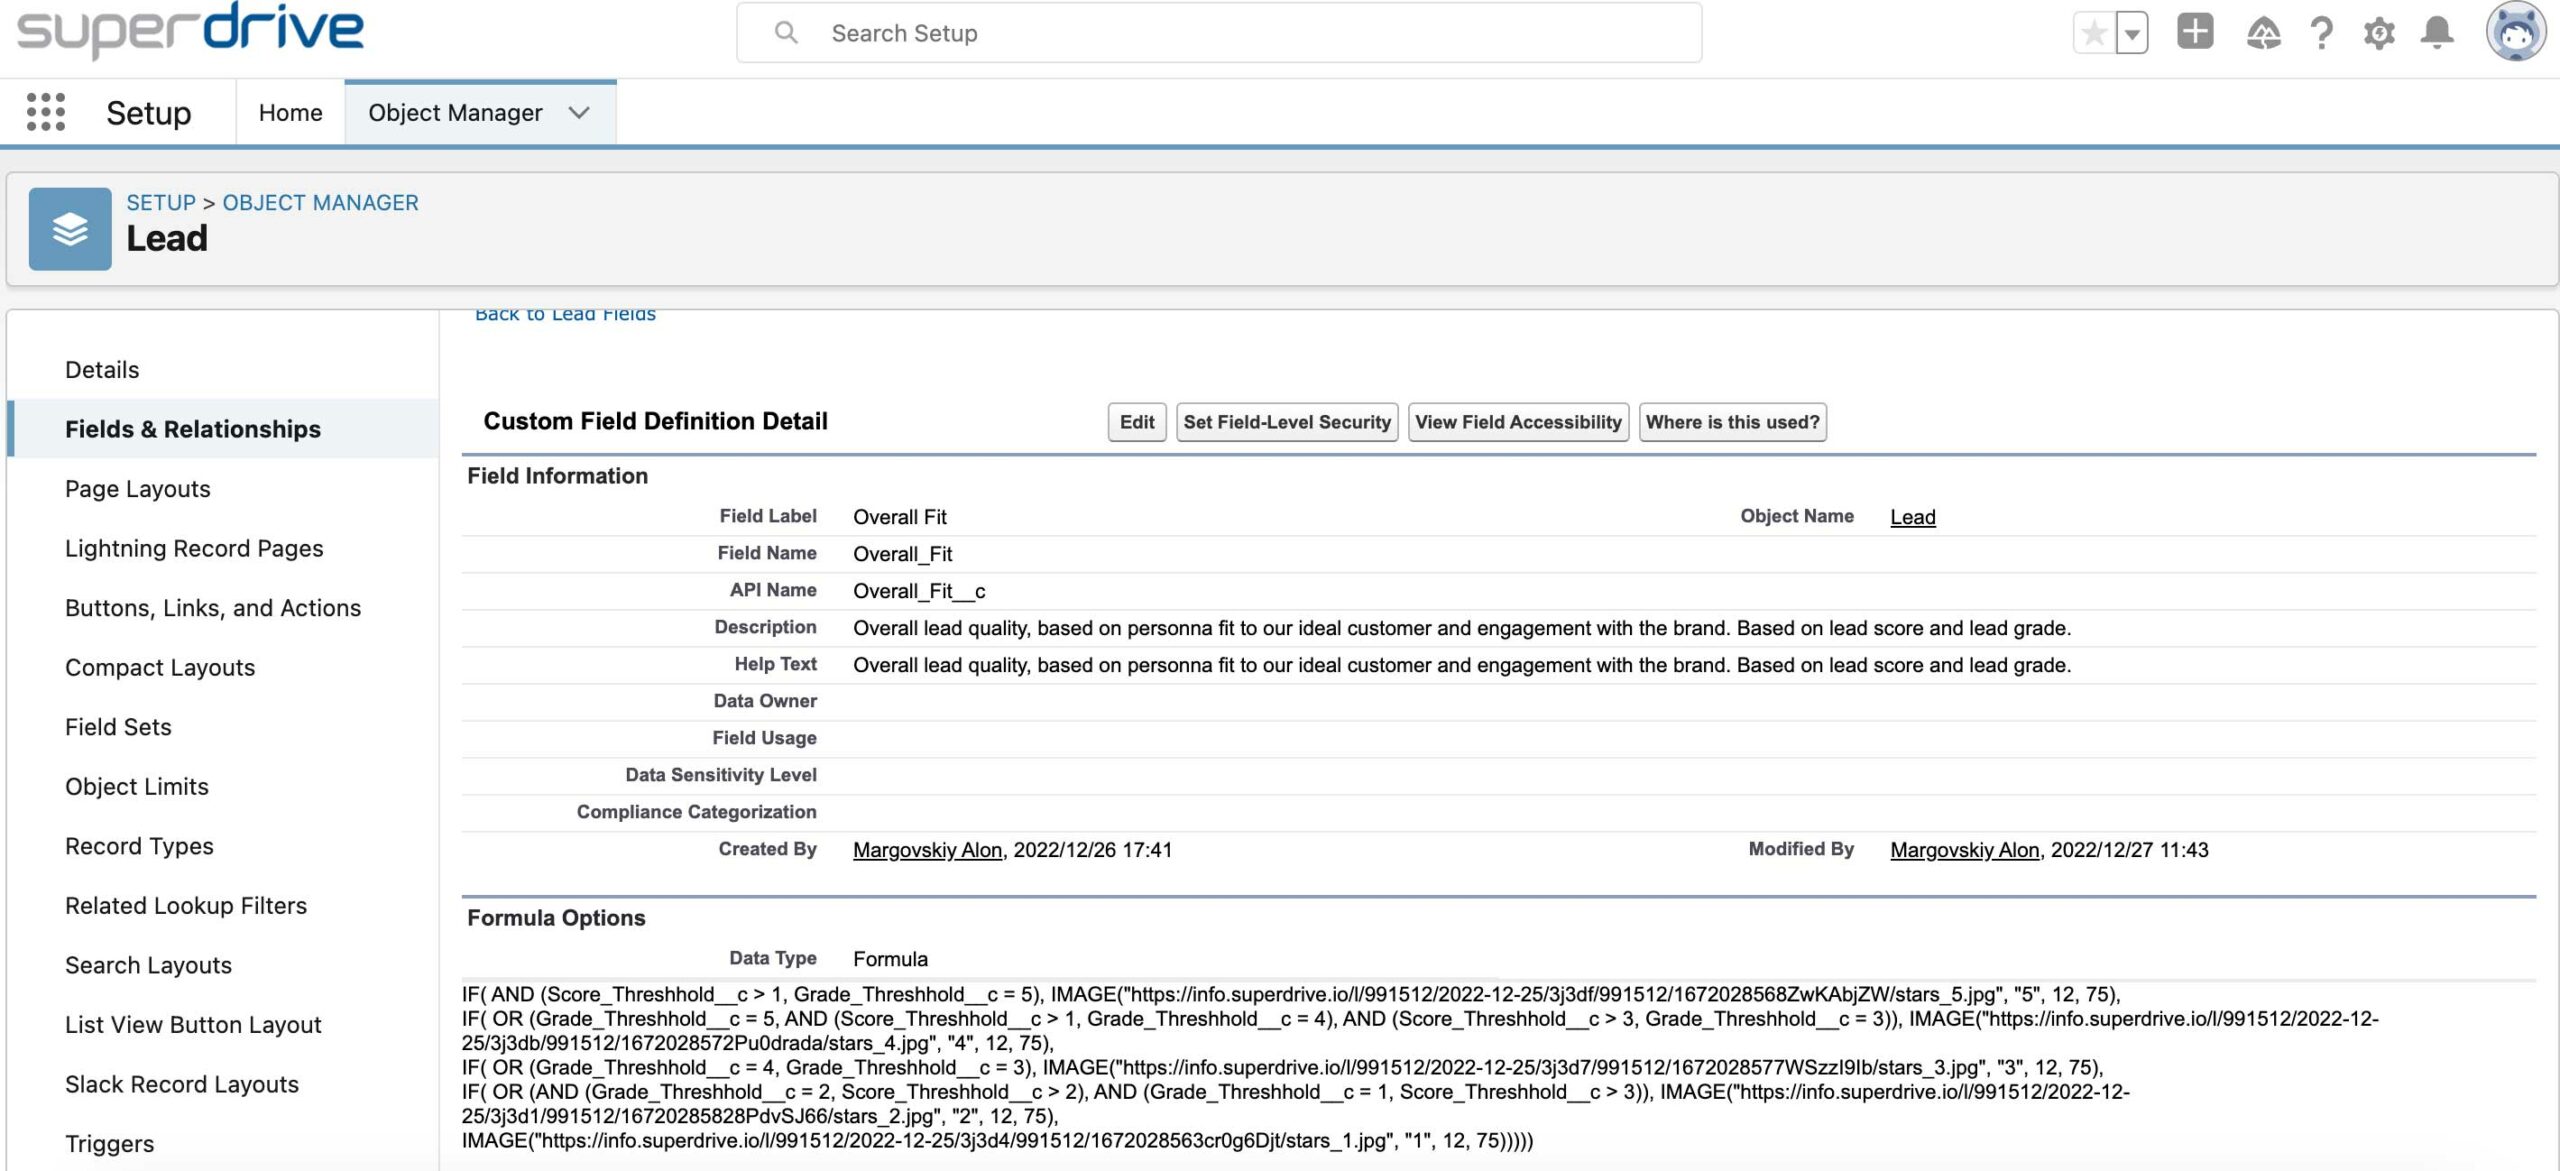 And there you have it! Now you can use your 5 point star scale in your page layouts, list views and even reports.
Here are some examples: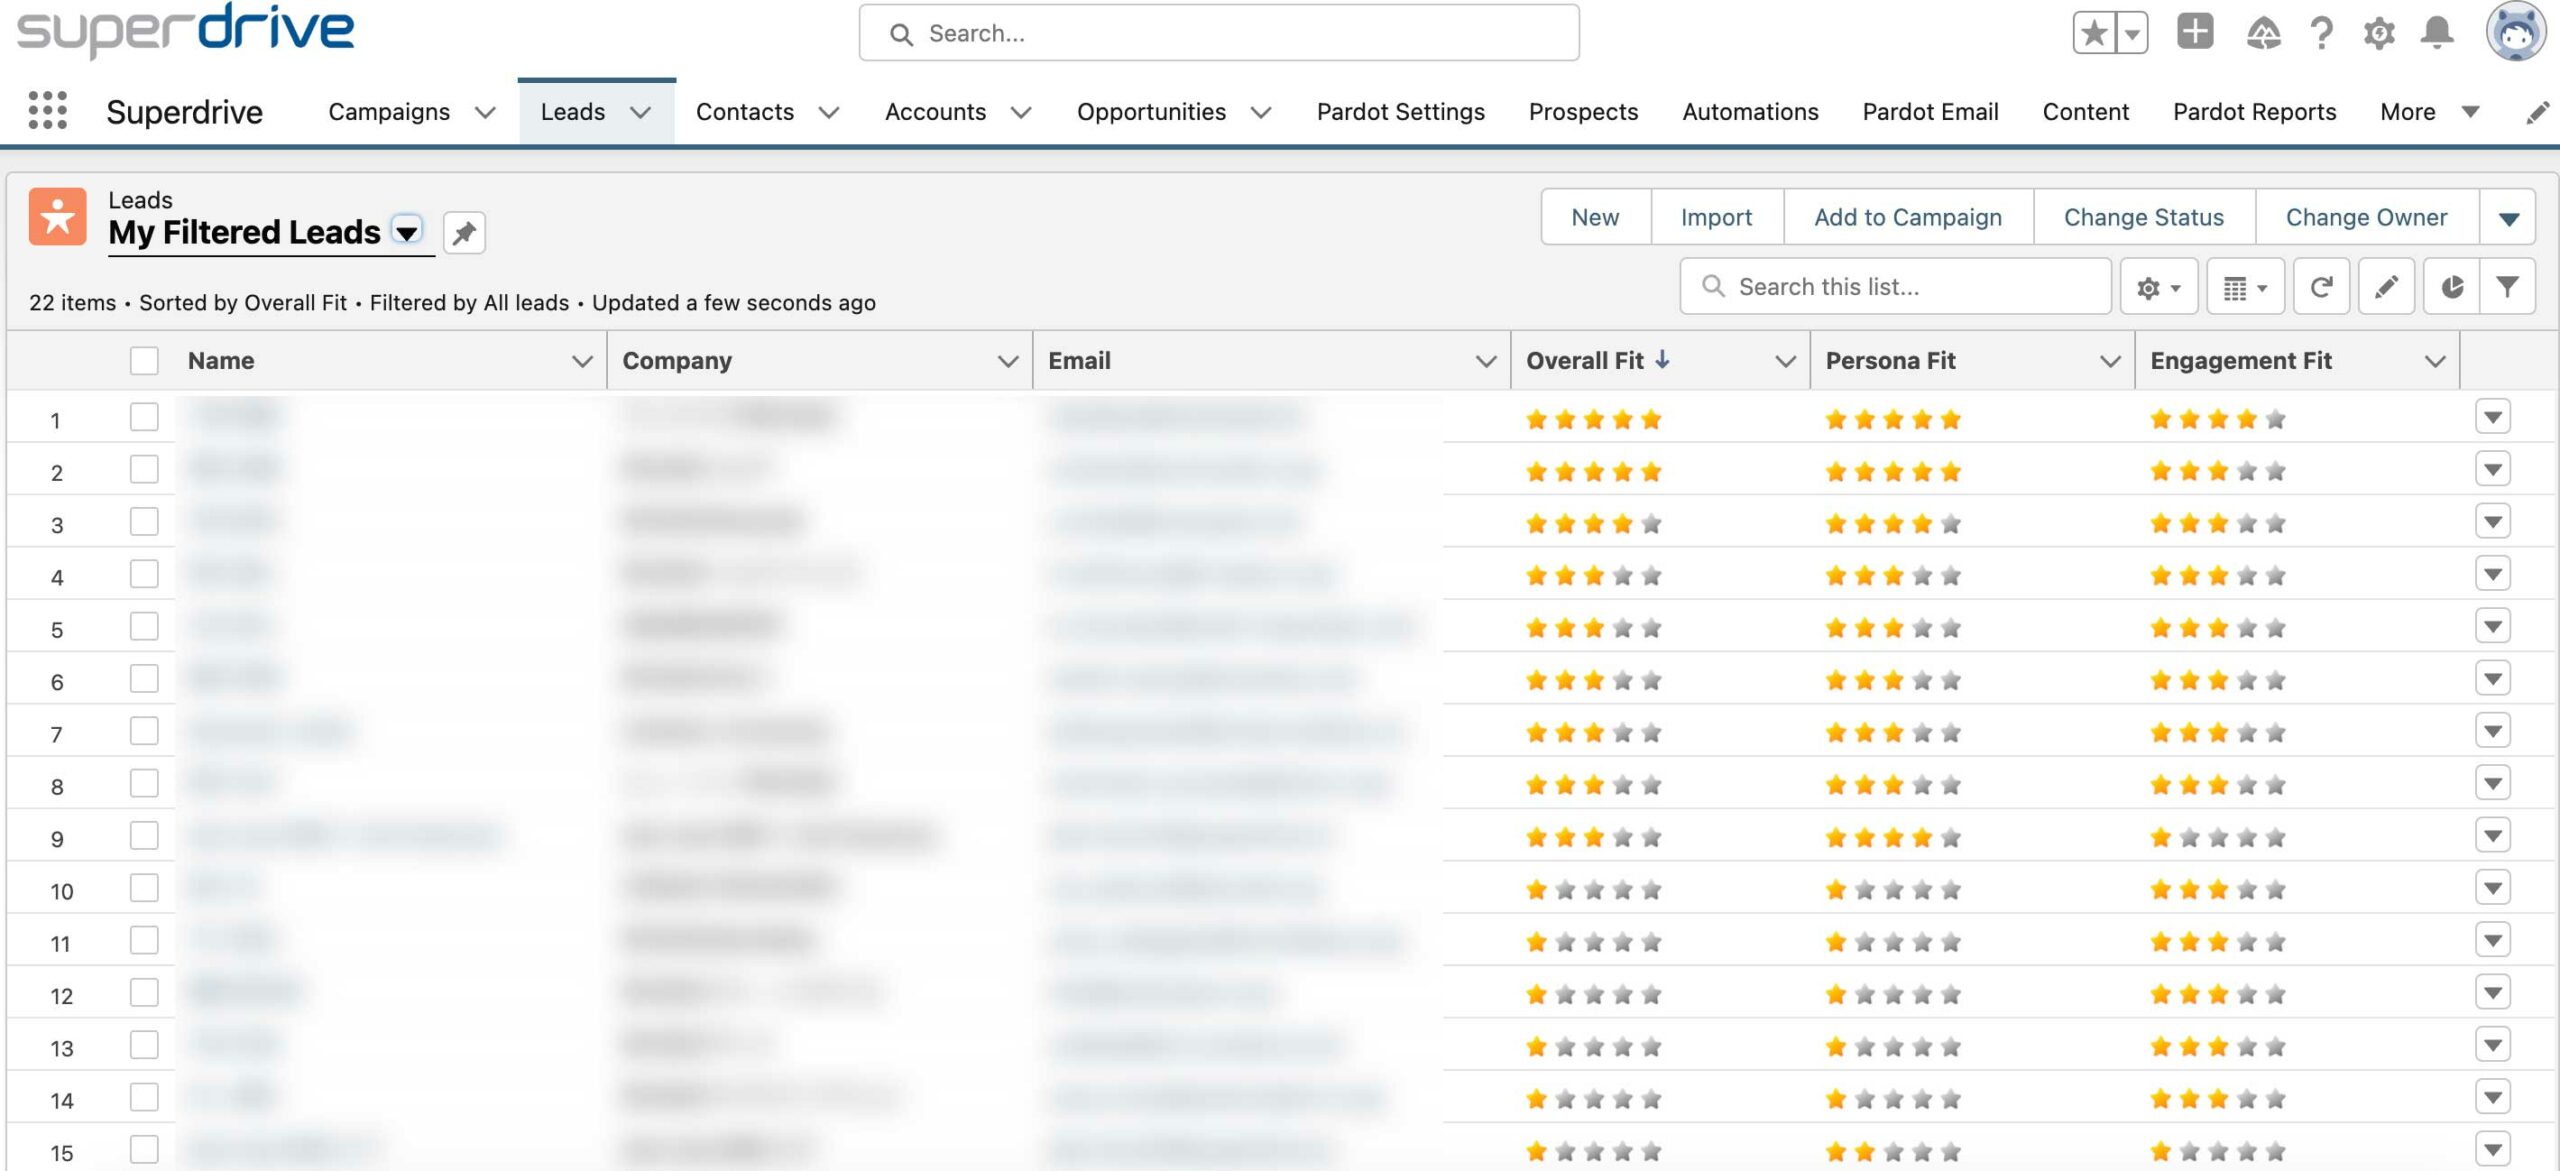
 To get in touch with our team of experts, please drop us a line in the form.
Written by Alon Margovskiy, Head of Marketing Automation, Superdrive.
Superdrive is an official Salesforce Partner with Salesforce Certified Marketing Cloud Specialists and Consultants.