Salesforce Marketing Cloud Account Engagement (Pardot) Engagement Studio allows you to create automated email journeys, drip campaigns, sequences…whatever you want to call them.
While the tool is pretty simple to understand once you get the hang of it, the out of the box reporting is not so great…
In this blog post, I will show you how to set up your Salesforce Marketing Cloud Account Engagement (Pardot) engagement studio campaigns so that they are reportable and dashboardable in Salesforce.
Initial Setup
Before I continue, some initial settings are required.
If Superdrive is doing your implementation, we will take care of this for you. However, in case you are doing it yourself, I will summarize the initial settings for you below, with some Salesforce help links.
1.Set up Connected Campaigns
First, you need to set up connected campaigns. The guide is here. Connected campaigns, as the name implies, replaces the idea of pardot campaigns and salesforce campaigns being two separate things and instead uses a single Salesforce campaign object in both systems. This is what allows Pardot data to sync through to Salesforce and allow us to report on it.
2.Get the Pardot lightning app
3.Enable Engagement History
Next, you will want to activate engagement history and create custom report types. The guide is here. Engagement history allows us to report on and display Pardot data in Salesforce, including email performance, landing page and form submission data and custom redirect data.
Setting up Salesforce campaigns
All done! Now, let’s step up our Salesforce campaigns
With your initial settings done, before you create anything with regards to your emails or engagement studio program itself, you will want to focus first on creating some campaigns to house everything.
For every email you send, you will want it to have its own associated Salesforce campaign. In addition, for organization’s sakes, it is a good idea to have a single Parent campaign to house all of your child campaigns. Think of the parent campaign as the cover of the book and the child campaigns as the individual pages within it.
For example, if I had a sample nurturing email campaign, I may lay it out like this:
Parent campaign:
EM-Sample Nurturing Email 123
Child Campaigns that nest under the parent campaign:
EM-Sample Nurturing Email 123 Email 1
EM-Sample Nurturing Email 123 Email 2
EM-Sample Nurturing Email 123 Email 3
EM-Sample Nurturing Email 123 Email 4
Here is how you can set this up:
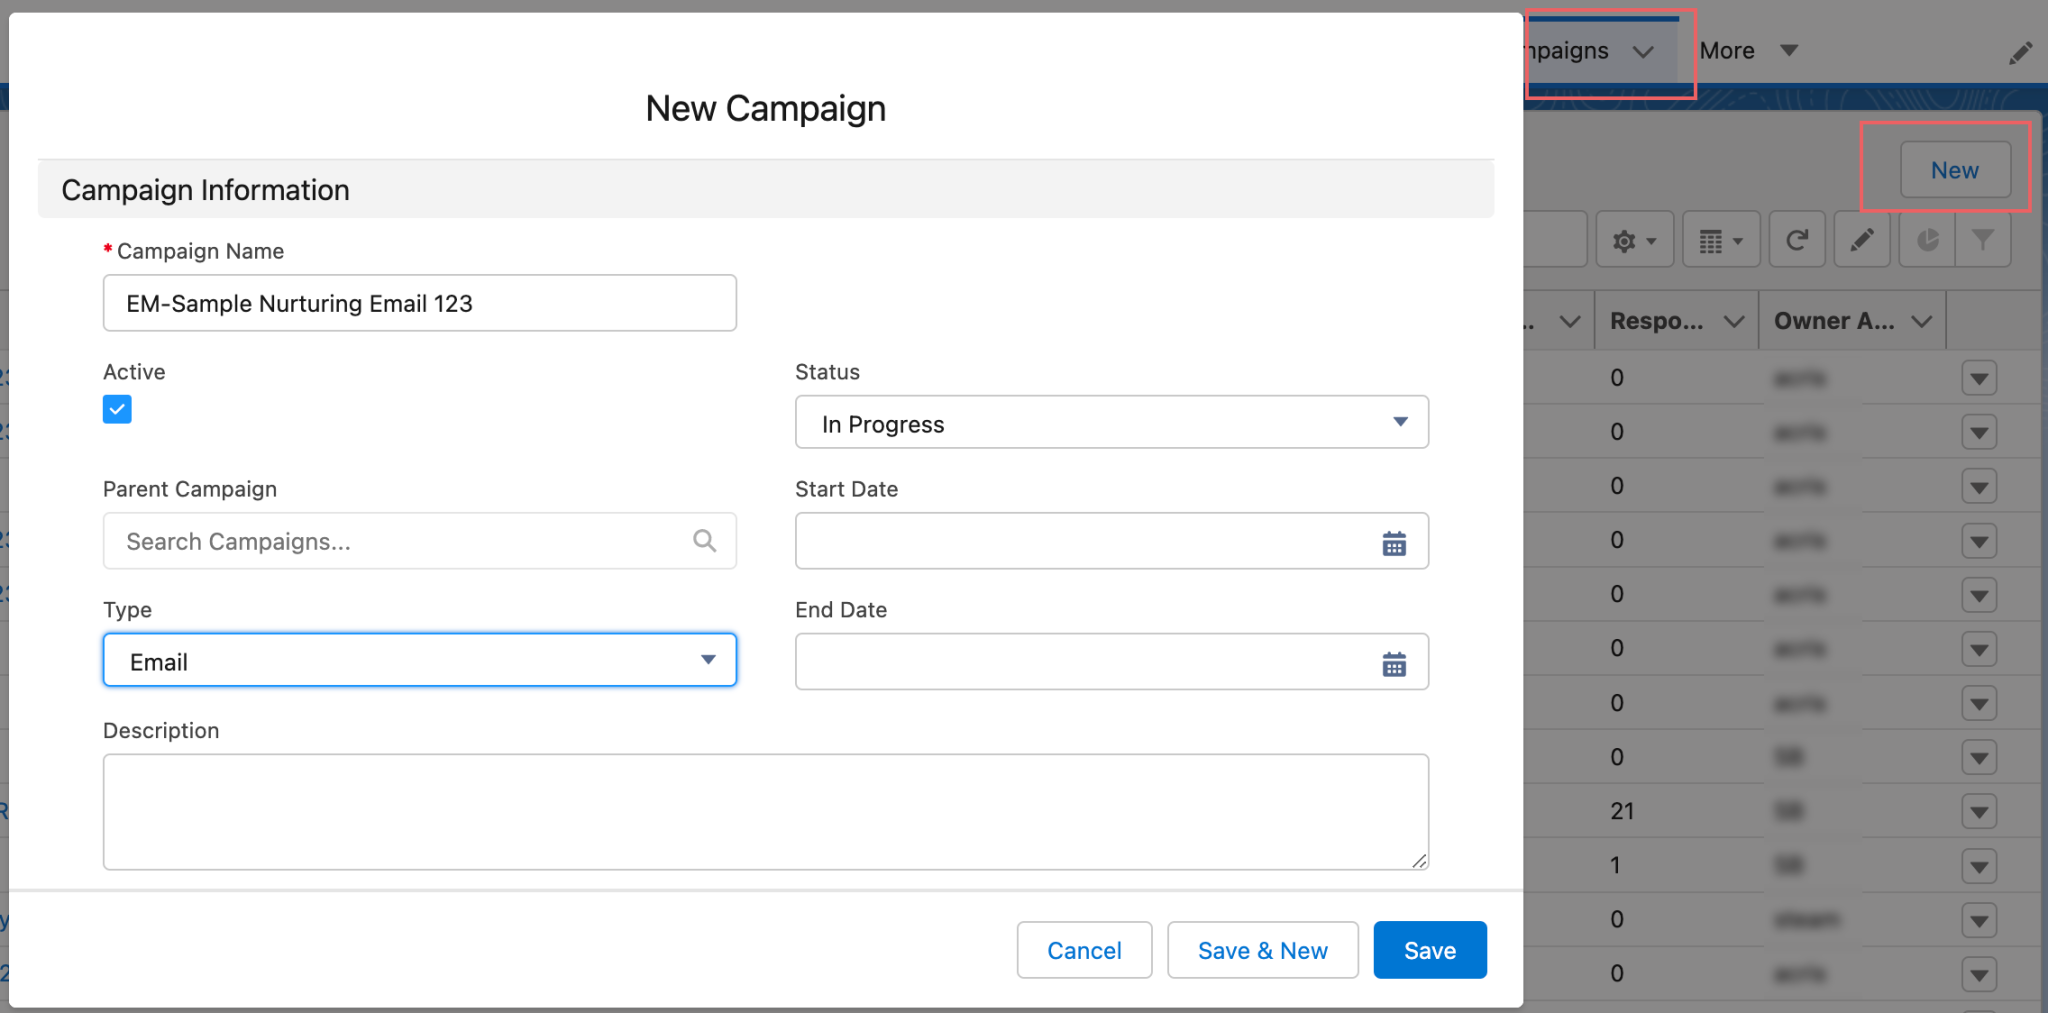
Create a parent campaign
- Head over to “Campaigns” and click “New” to create this campaign.
- Fill in the name, check off the “Active” checkbox and set the type to Email.
- Now you’ve got your parent campaign! Easy.
 Create your Child campaigns
Next we will add the 4 child campaigns that will live inside our Parent campaign. On your “EM-Sample Nurturing Email 123” campaign screen, navigate to the dropdown on the top right and select “Child Campaign”. Again, add a name and make sure active is checked.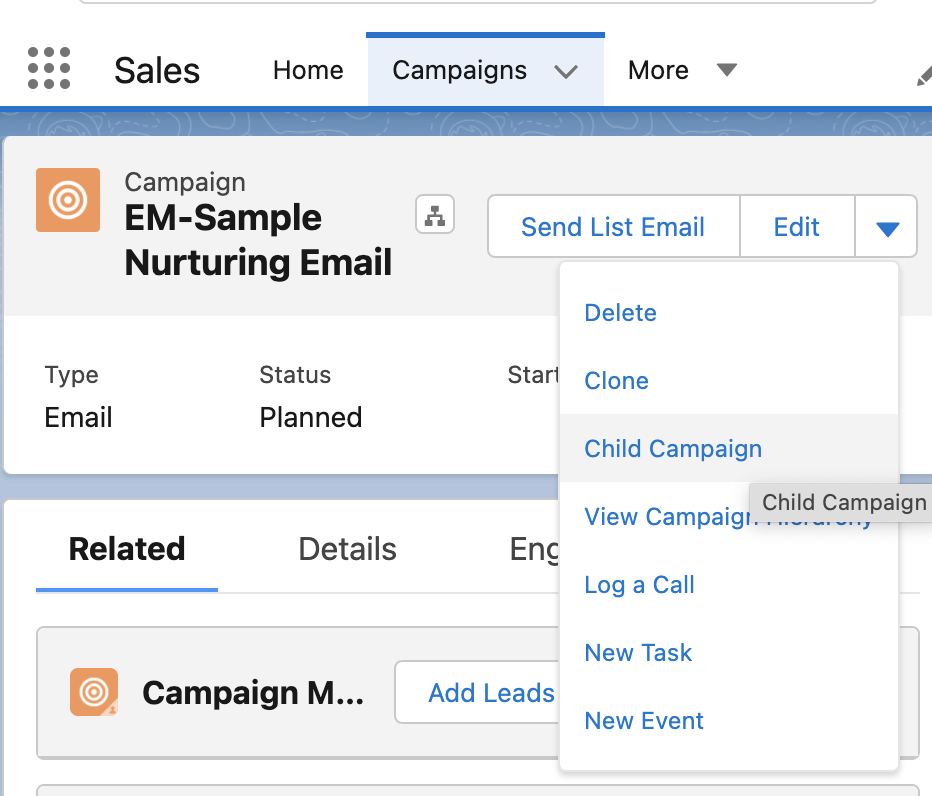
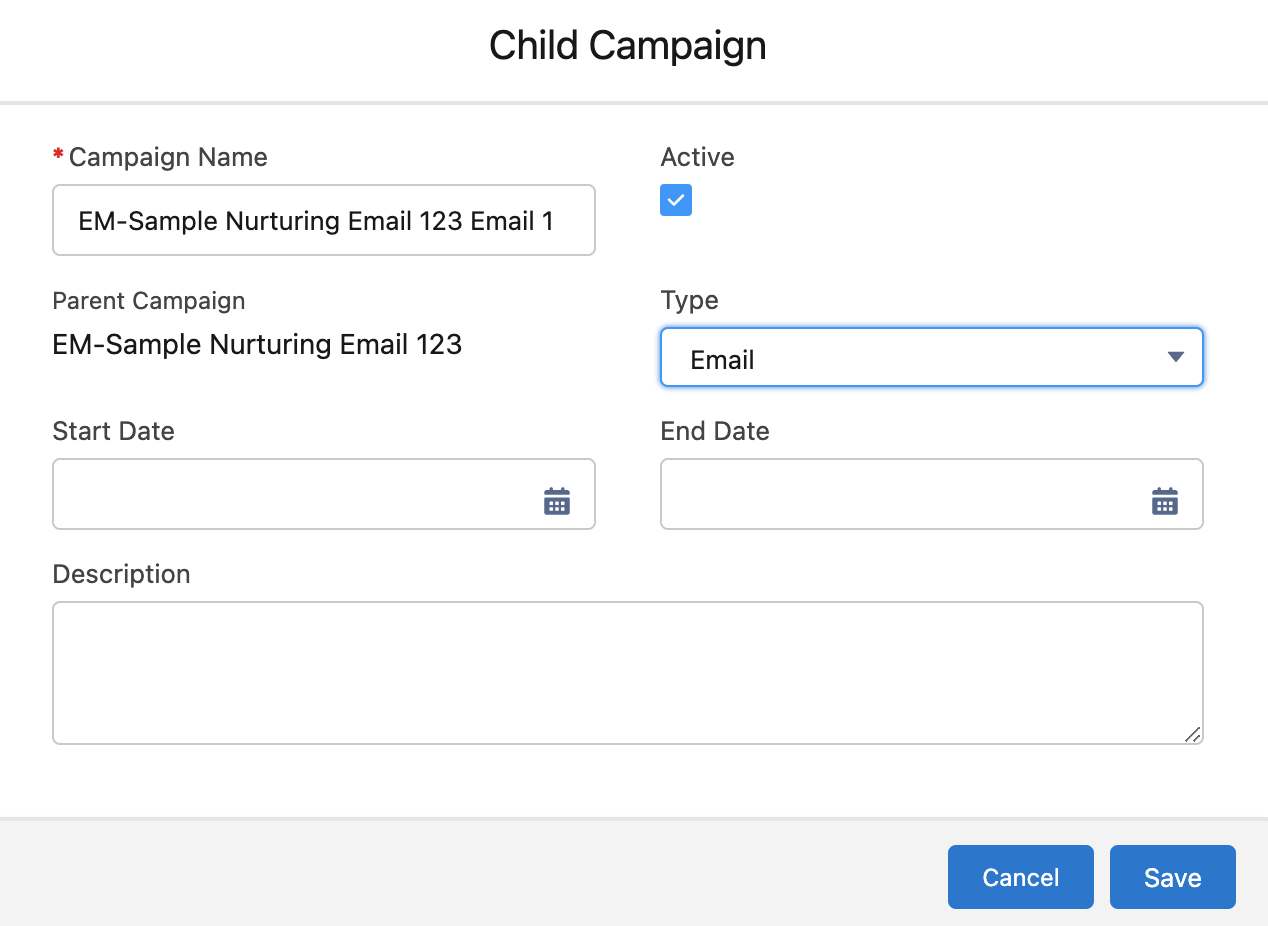 Done!
Done!
Now, since I have 4 emails in total, I will follow this same process 3 more times, so that there are a total of 4 child campaigns for emails 1, 2, 3 and 4.
Add Member Statuses
Now that we have our campaigns built, including a parent campaign and child campaigns within it, we want to add member statuses to each of the four child campaigns. Campaigns house prospects and member statuses give us more detail about how they interacted with the campaign. For example, for a typical email campaign like the one we are creating, I recommend having the following member statuses:
- Sent- This is a default member status and we can use it to signify that we sent the email to this prospect
- Opened- This is a custom member status we will set to signify that the prospect has opened the email
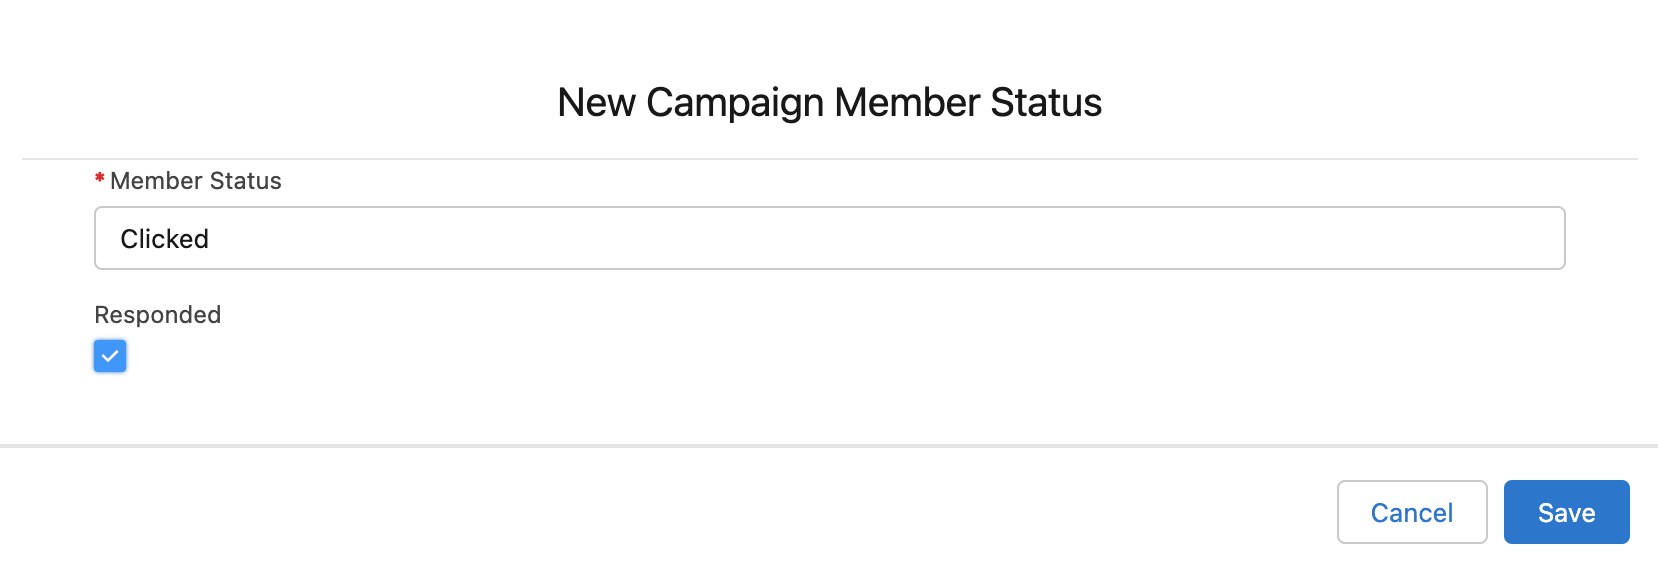
- Clicked- Another custom member status we will set when the prospect clicks the email
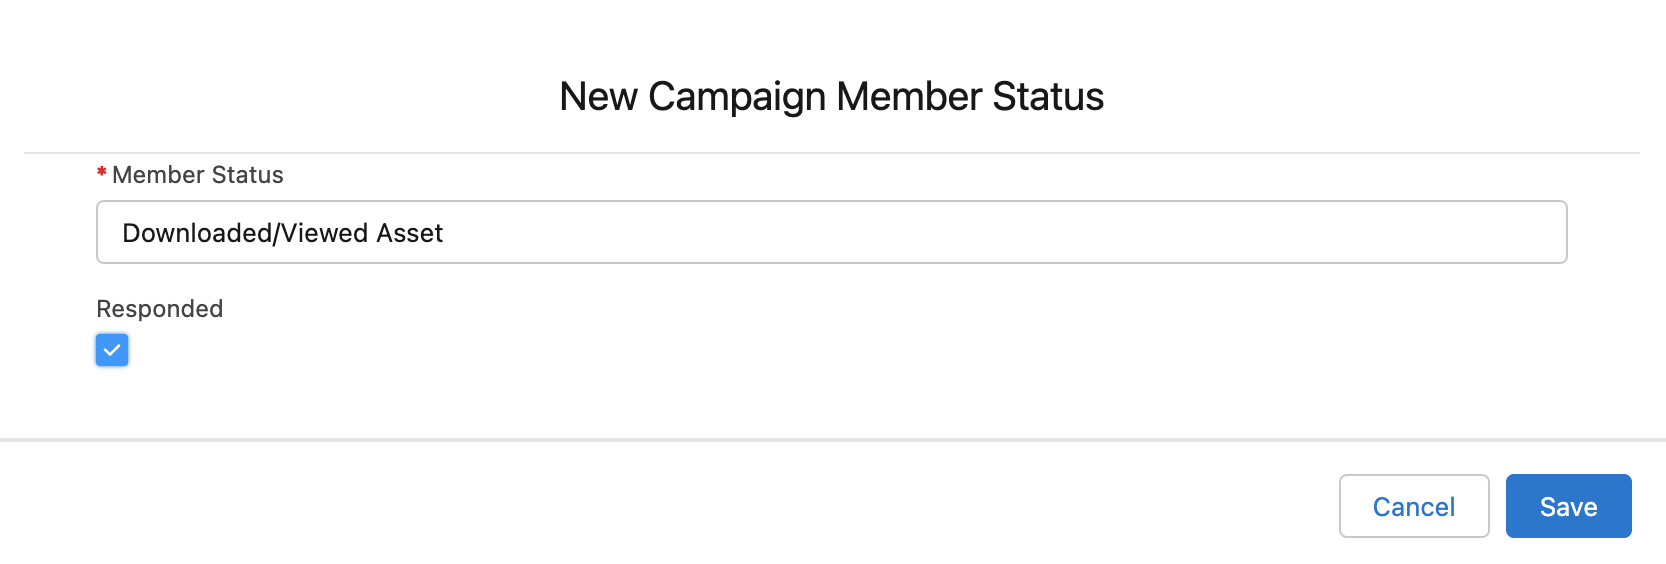
- Downloaded/Viewed Asset- If the email has a link to a whitepaper link or a youtube video, or any other important call to action, we do not want it to just be categorized as a “click” but more of a download or view, of an asset. This is what this member status is for.
To create your member statuses, go back to the EM-Sample Nurturing Email 123 Email 1 campaign you created and scroll down to campaign member statuses and click New.
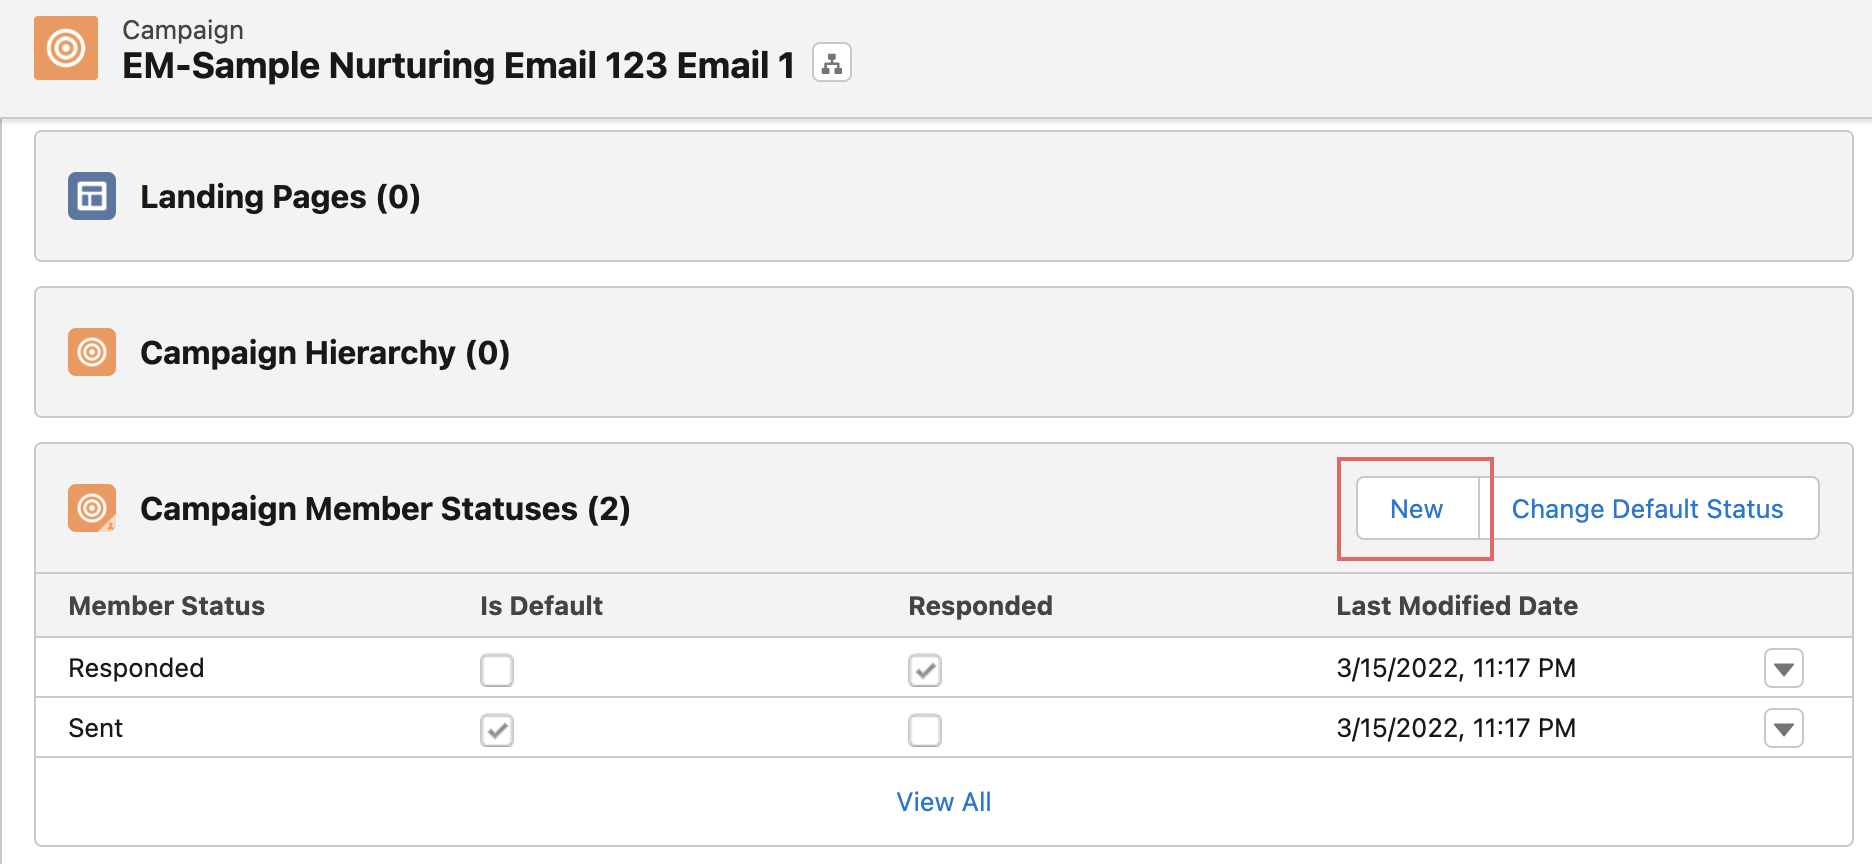 Create your Opened, Clicked and Viewed/Downloaded Asset member statuses one by one. I like to leave responded unchecked for opened and checked for “Clicked” and “Viewed/Downloaded Asset”.
Like this: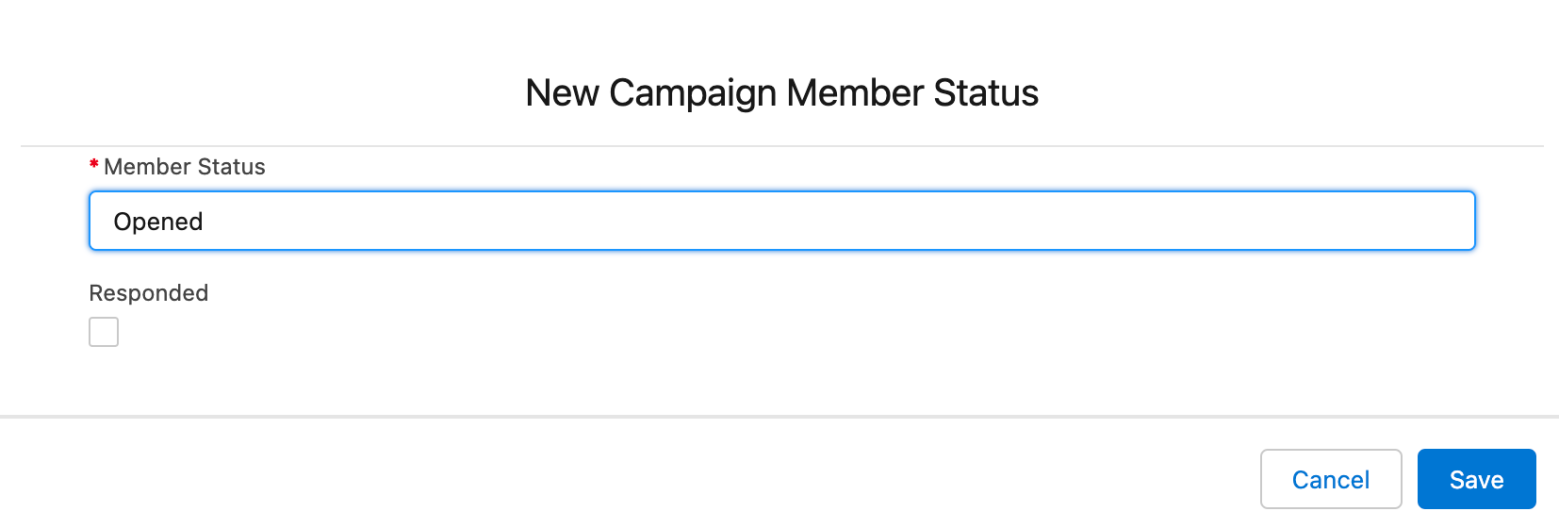
 All done!
Now, again, repeat this for your email 2, email 3 and email 4 child campaigns so that all your child campaigns have the same member statuses.
Creating Emails
Now that your campaign settings are good to go, let’s finally jump into Pardot and start creating our journey. We will start with the email itself.
Create your email template in pardot and make sure for the Campaign you select one of the child campaigns we just created. For example, for my first email I will select “EM-Sample Nurturing Email 123 Email 1”.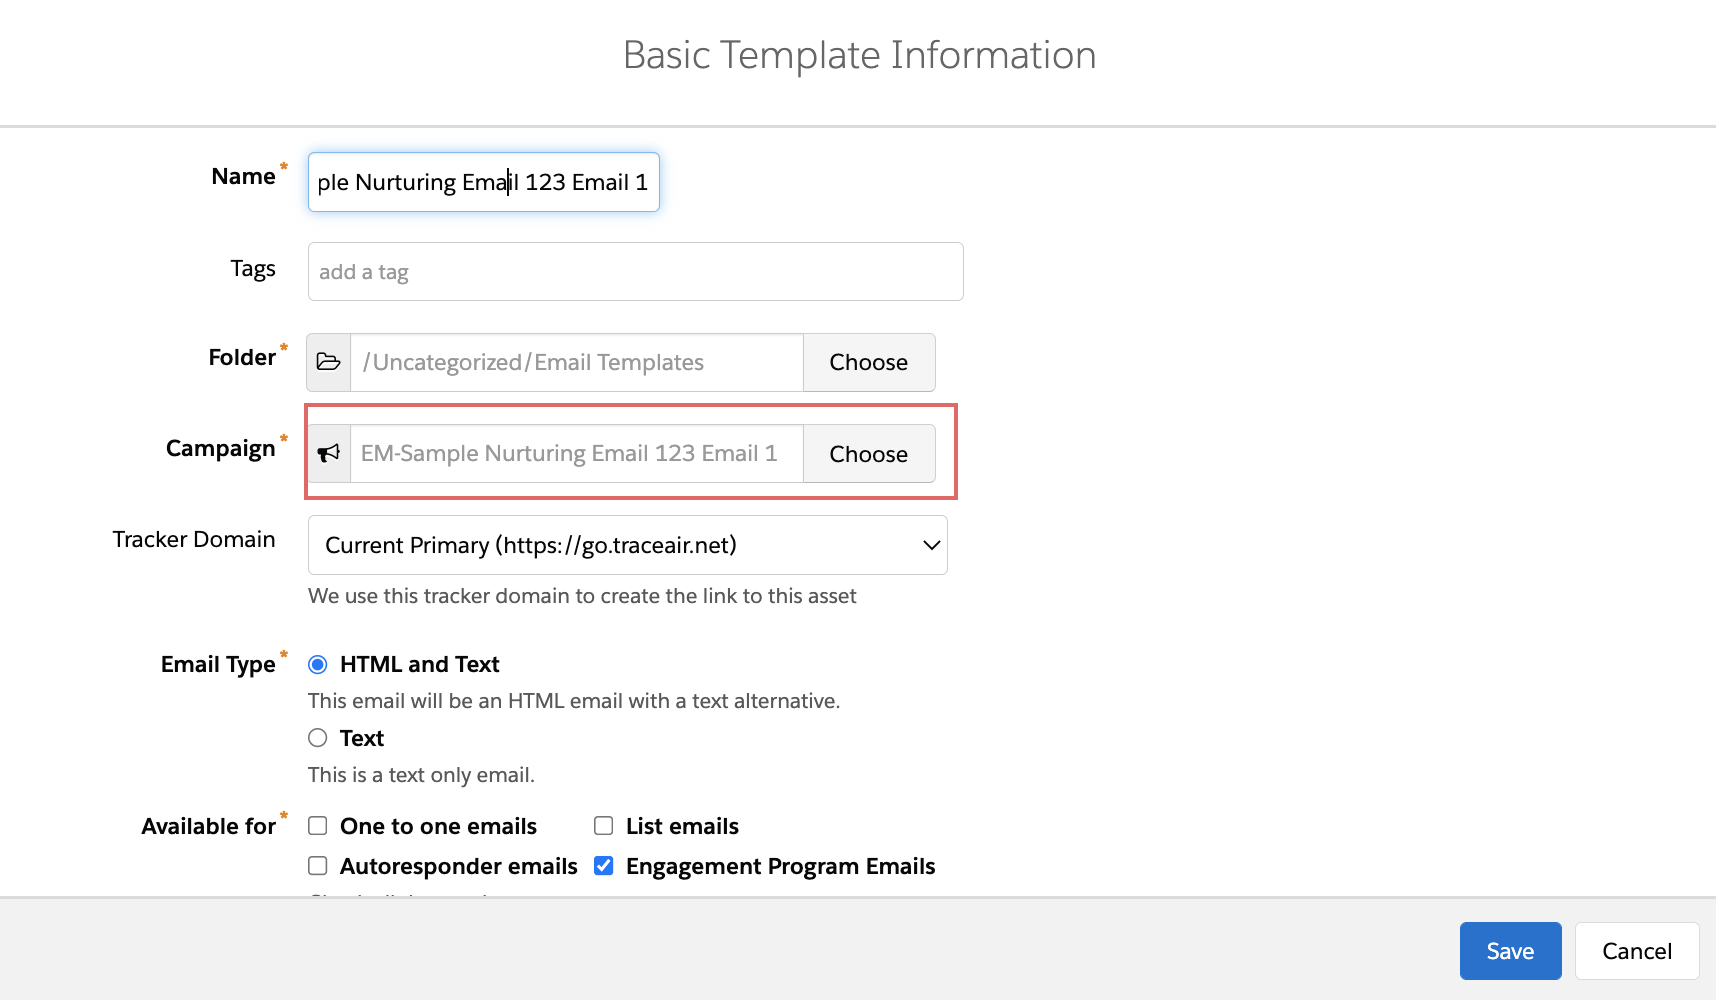
Creating Engagement Studio program
Next, let’s work on the final step of deploying our drip sequence, which is setting up our Engagement Studio program. Here is how you will want to set things up for best results:
Step 1: Action – Send Email
Step 2: Action – Add to Salesforce campaign “EM-Sample Nurturing Email 123 Email 1” with status “Sent”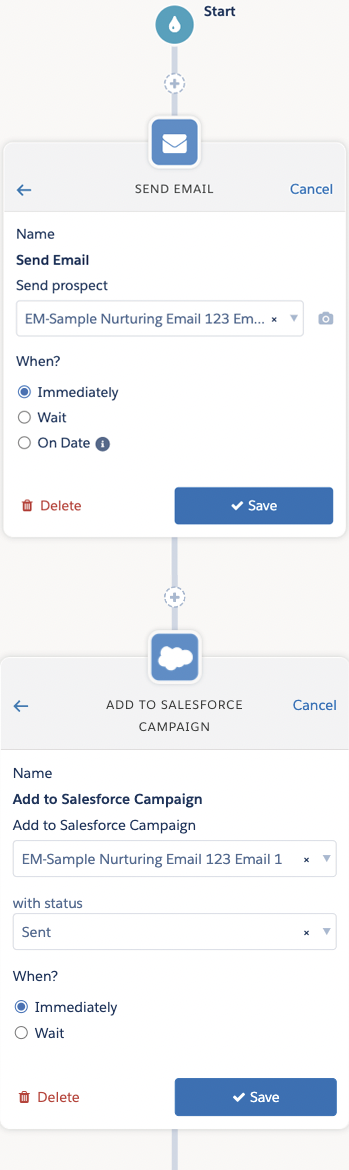
Step 3: Trigger – Clicked specific link in the email (choose your whitepaper link). Assess for up to 2 days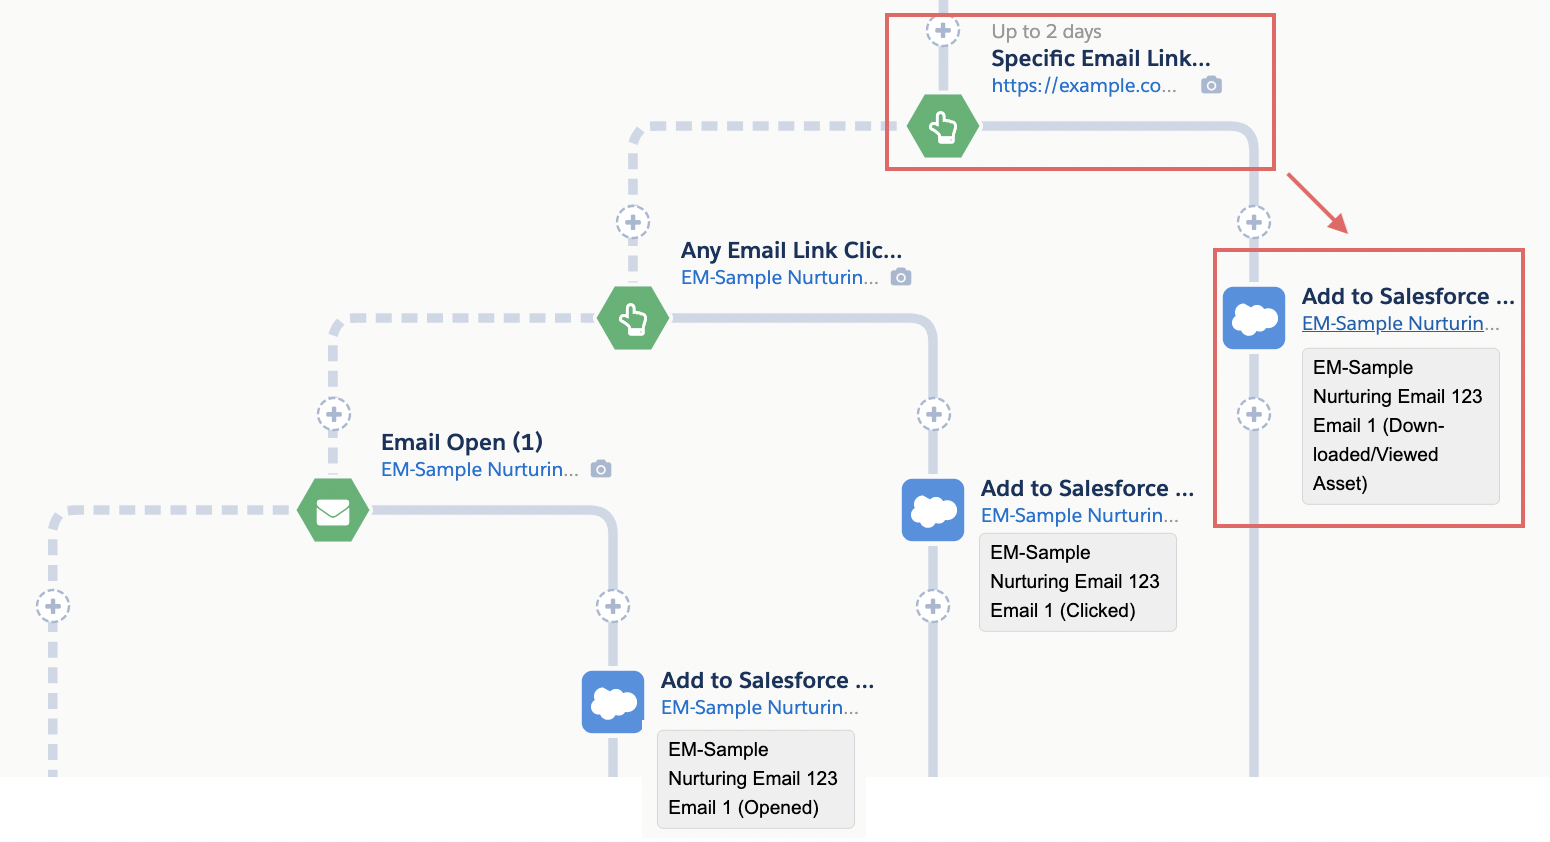
(In this step, Pardot will check for up to two days if the prospect clicked the whitepaper (or other important call to action) link in your emails. Basically, if they clicked this link, it means they downloaded or viewed your asset, so we want to assess this.If they DID download the whitepaper or view your important asset, in Step 3, the next step is to add prospect to salesforce campaign “EM-Sample Nurturing Email 123 Email 1” with status “Downloaded/Viewed Asset”. Since they clicked through and downloaded, we are marking the member status as such. After that, we will move the prospect to the next step, which is sending Email 2 after 3 additional days.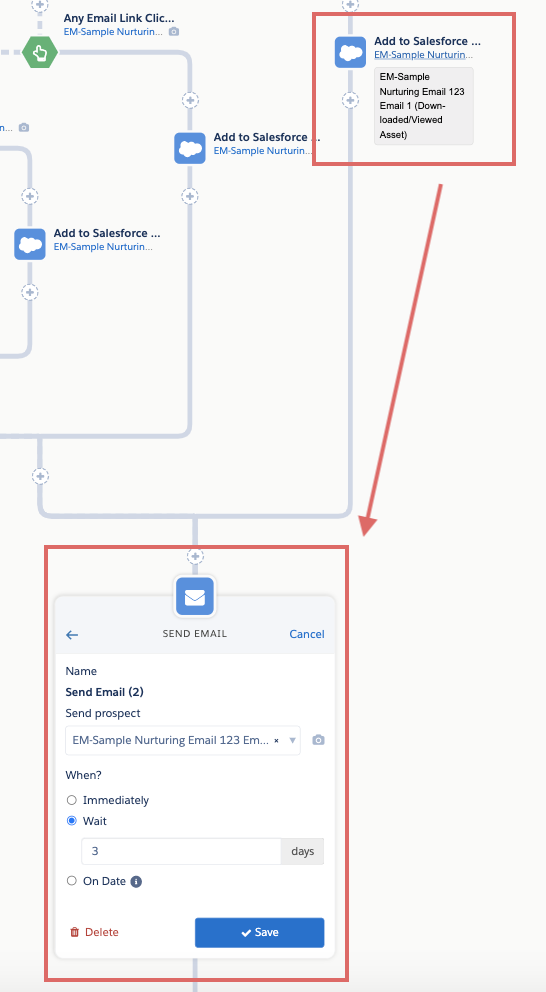
If they did NOT download the whitepaper or important asset, in Step 3 within the two day time period since the email was sent, we will move the prospect to the next trigger step below.
Step 4: Trigger – Clicked link in email (any link in the email). Assess for 0 days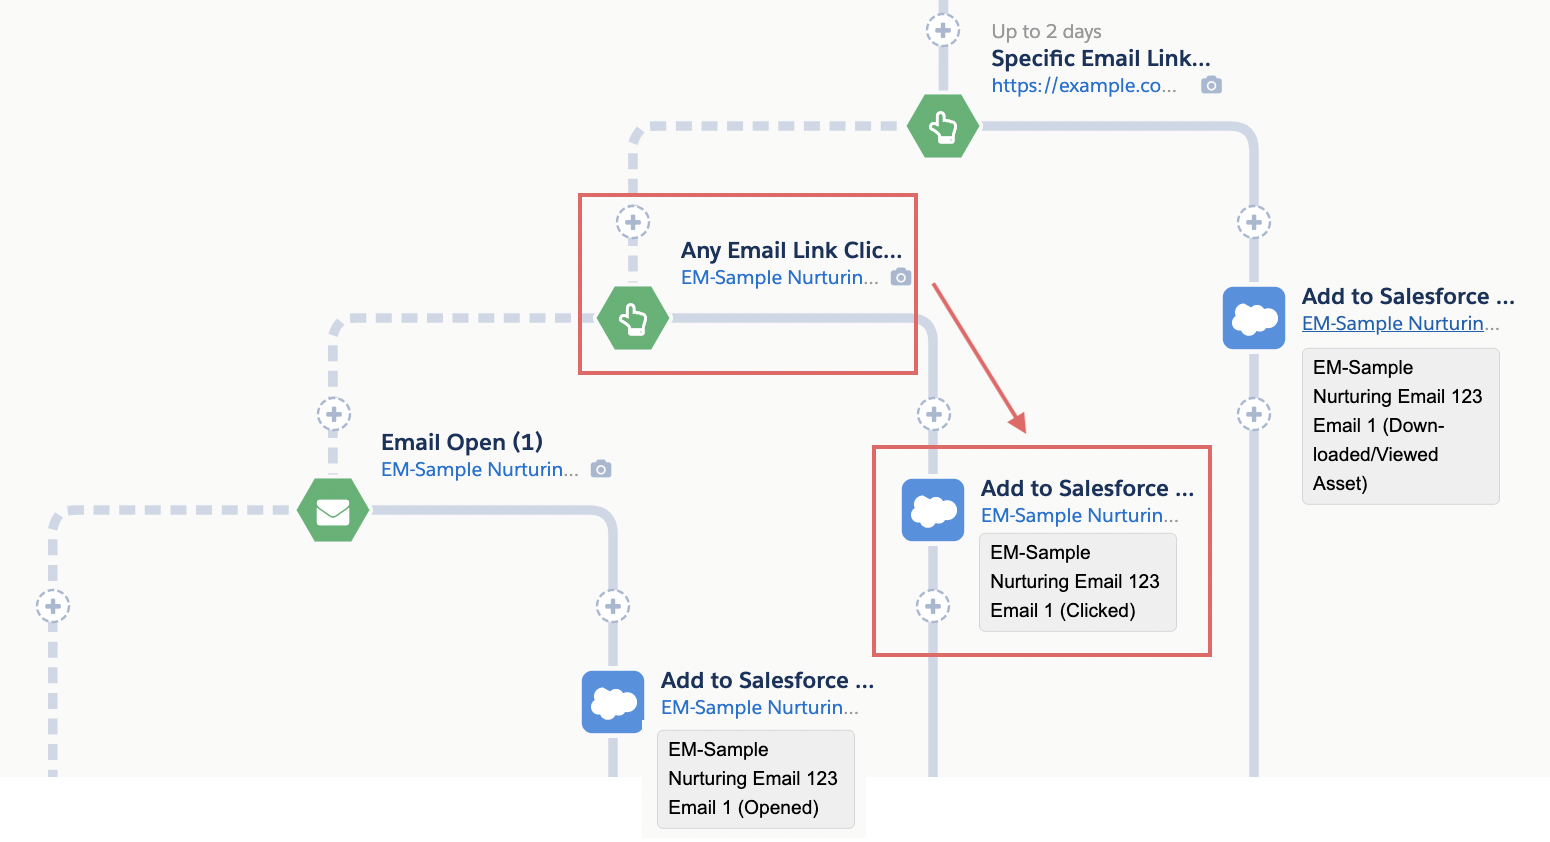 While they did not click through to the call to action, we now want to assess if they clicked any OTHER links in the email. This could be your social media links, your logo, your other links to the webpage, or any secondary call to actions you may have in the email. If they did we want to make sure we recognize their status as a “click”, so it is important to check this. Timing-wise, we want to set this to 0 days (assess right away). This is because we just spent 2 days with our previous trigger, so 2 days have already passed since the email send. It is more than enough time for them to have clicked through.If they DID click a link in the email, we will add the prospect to the salesforce campaign “EM-Sample Nurturing Email 123 Email 1” with status “Clicked”. So, we are changing their status from Sent to clicked. After that, we will move the prospect to the next step, which is sending Email 2 after 3 additional days.
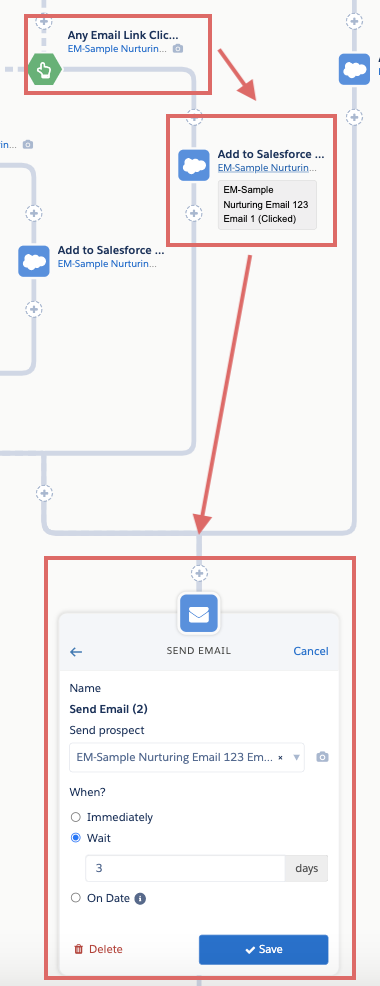 If they did NOT click a link in the email in step 4 we will move the prospect to the next trigger step below.
Step 5: Trigger – Opened email. Assess for 0 days
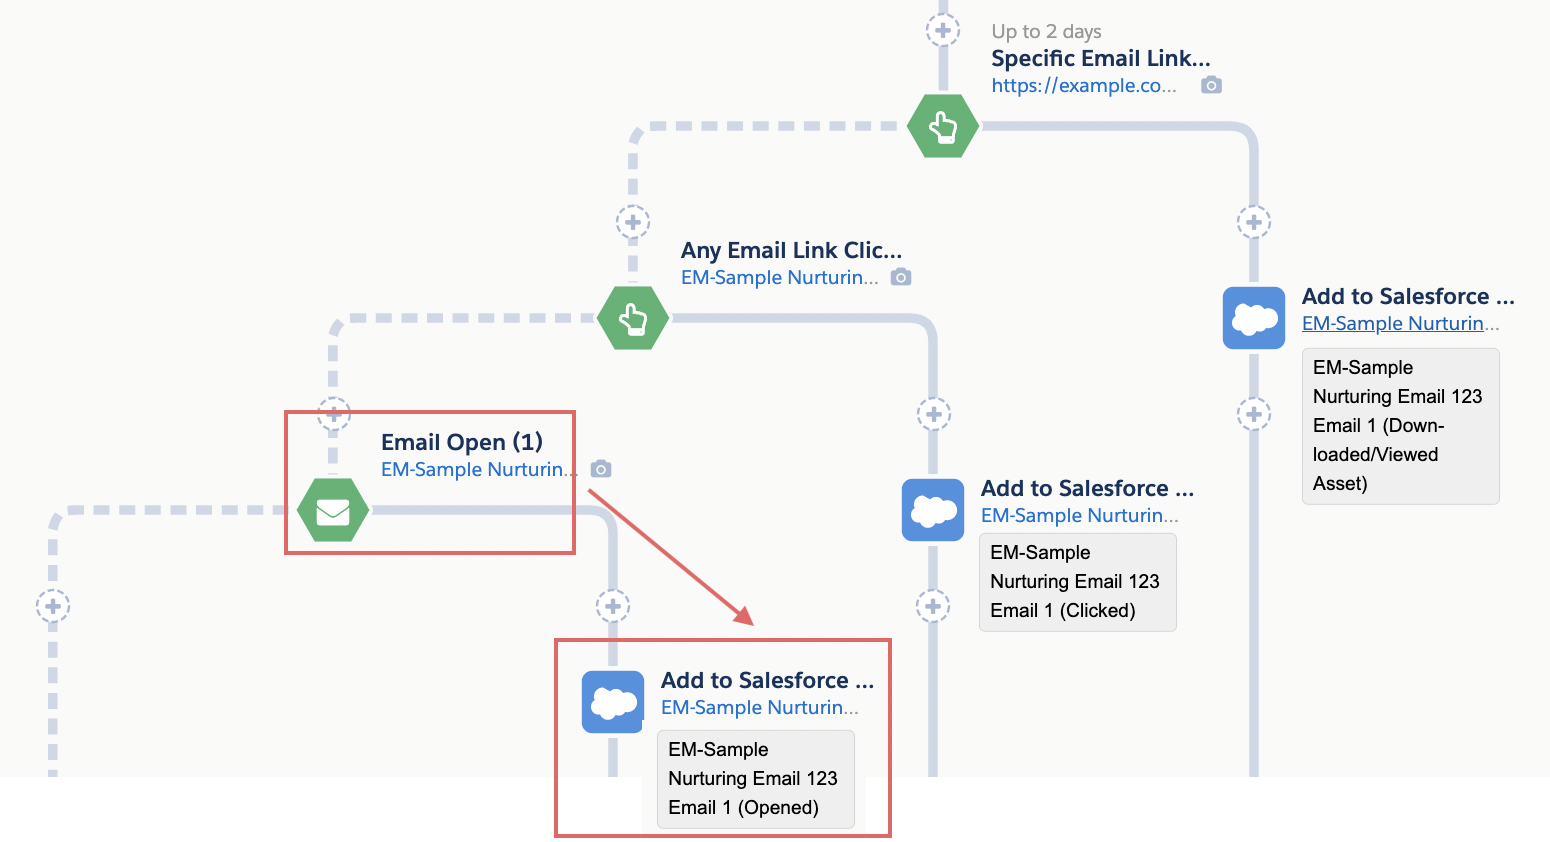 At this stage, 2 days have passed since the email was sent and they did not download the whitepaper nor click any other link in the email. So, as a final check, we will see if they at least opened the email. Again, this is a 0 day wait time trigger, as 2 days have already passed since the email send and they had more than enough time to open.If they DID open the email in Step 5, we will add prospect to the salesforce campaign “EM-Sample Nurturing Email 123 Email 1” with status “Opened”. If they did NOT open the email in Step 5, their status will just stay as “Sent”.
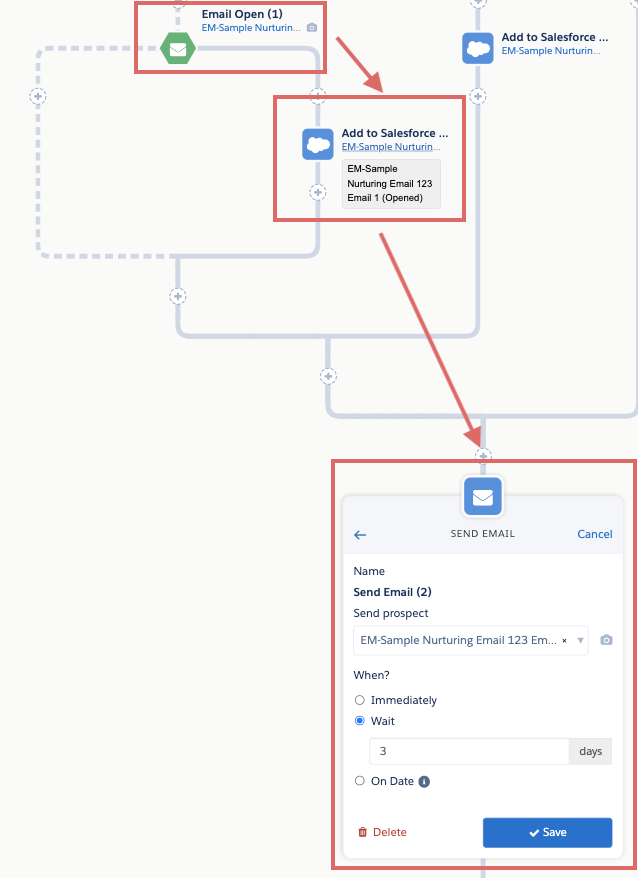 Whether they opened or not, the prospect will move to the next step which is sending Email 2 after 3 additional days.That’s it! Now we sent an email, assessed whether they downloaded an asset, clicked it or opened it and set their status appropriately.This completes all the actions and triggers for email #1, so you will want to replicate the exact same way for emails 2, 3 and 4, in the next paths within the Engagement Studio.
Results via Salesforce Reports and Dashboards
Now that you have built your program, let’s build some reports from the results, so that your boss can get off your back already.
There are two types of reports you can build with the data. One is based on the Pardot List Email object, which uses the engagement history settings you set up earlier. This is a fancy way of saying, we can report on email opens, clicks and such.
The second is a campaign with campaign members standard salesforce object report, which uses the campaigns and member statuses you set up earlier. This is a fancy way of saying we can report on WHO clicked and opened and such.
Pardot Email Report (Engagement History)
This report will allow you to report on open and click rates and other relevant factors smoothly and easily, on an email by email basis, but will not allow you to see which prospects did the opening and clicking.
In Salesforce, navigate to Reports and search for “Email” or “Pardot”, it should pop up as one of the options, named something like “Pardot Email report” or “Pardot emails”.
Here is how I like to set this up from here:
Filters: Outline:
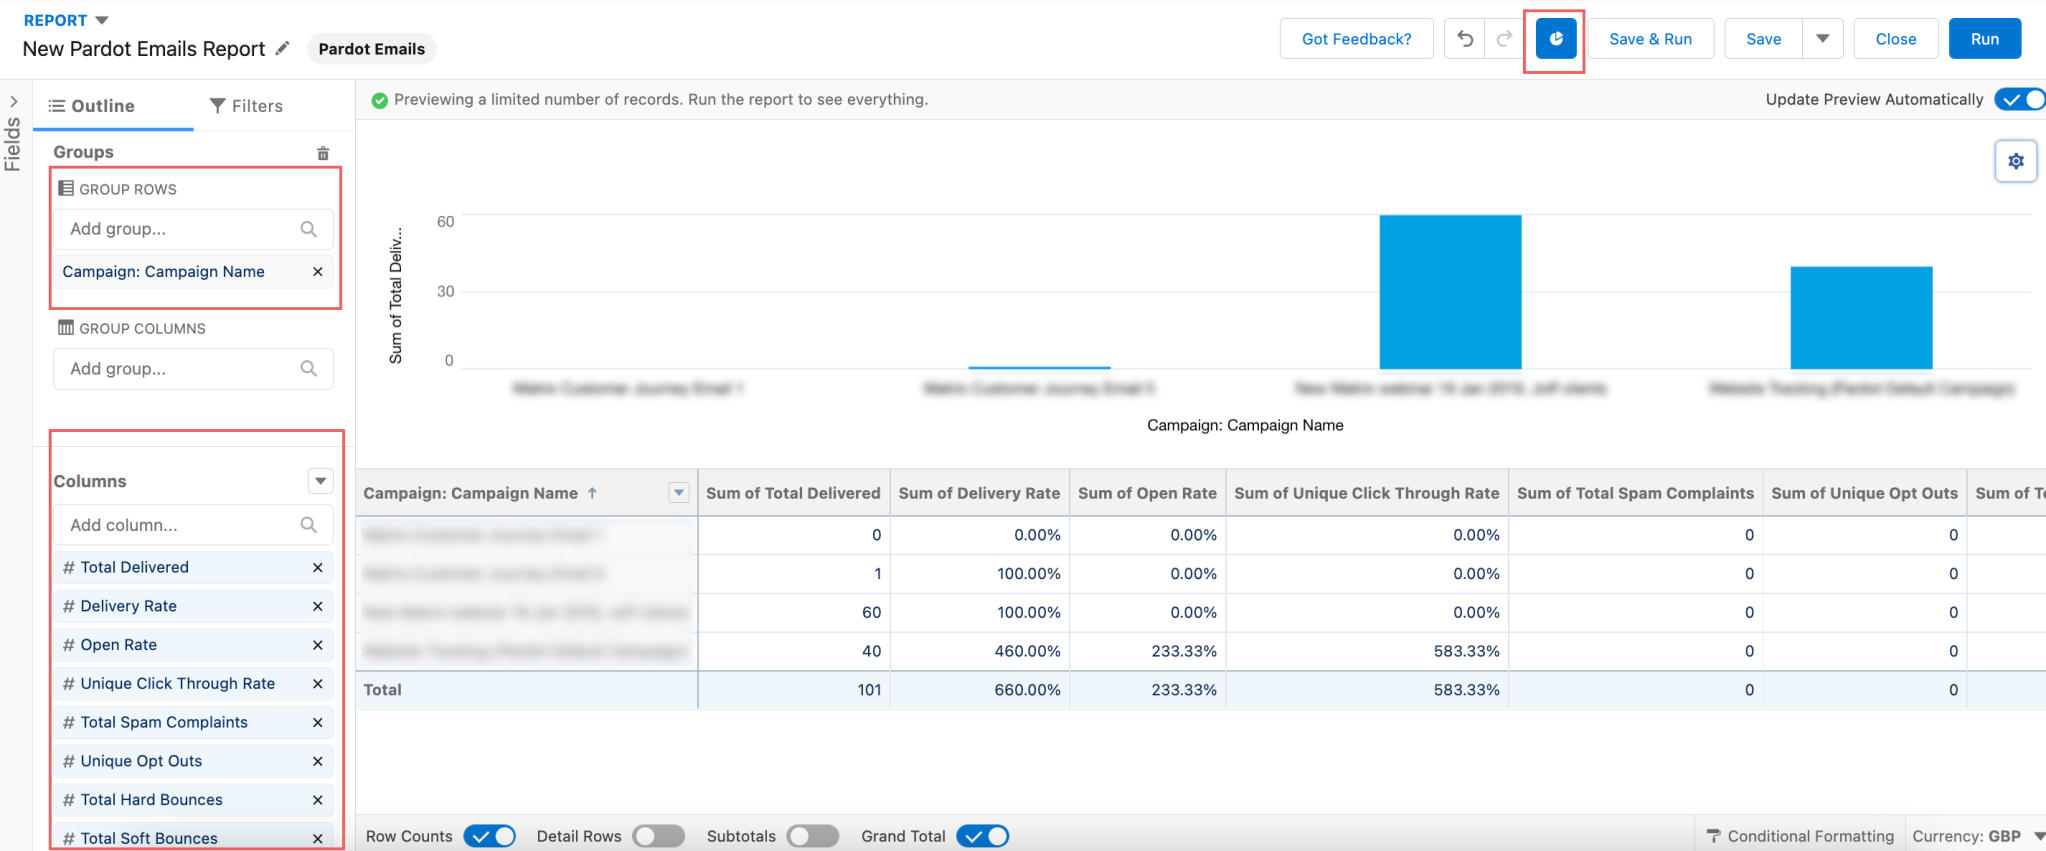 Campaign with Campaign Members report
While the pardot email report gives you good data on email performance, the campaign report can give you insight into the specific people doing the clicking, downloading and opening. This is where we will make use of those campaigns and members statuses we made earlier.
In Salesforce, navigate to Reports and select Campaigns with Campaign members.
Here is how I like to set this up from here:
Filters: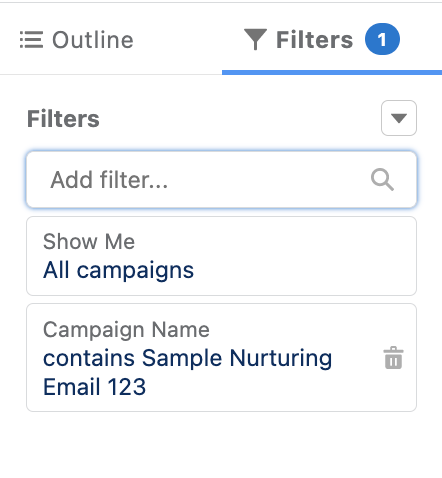 Outline:
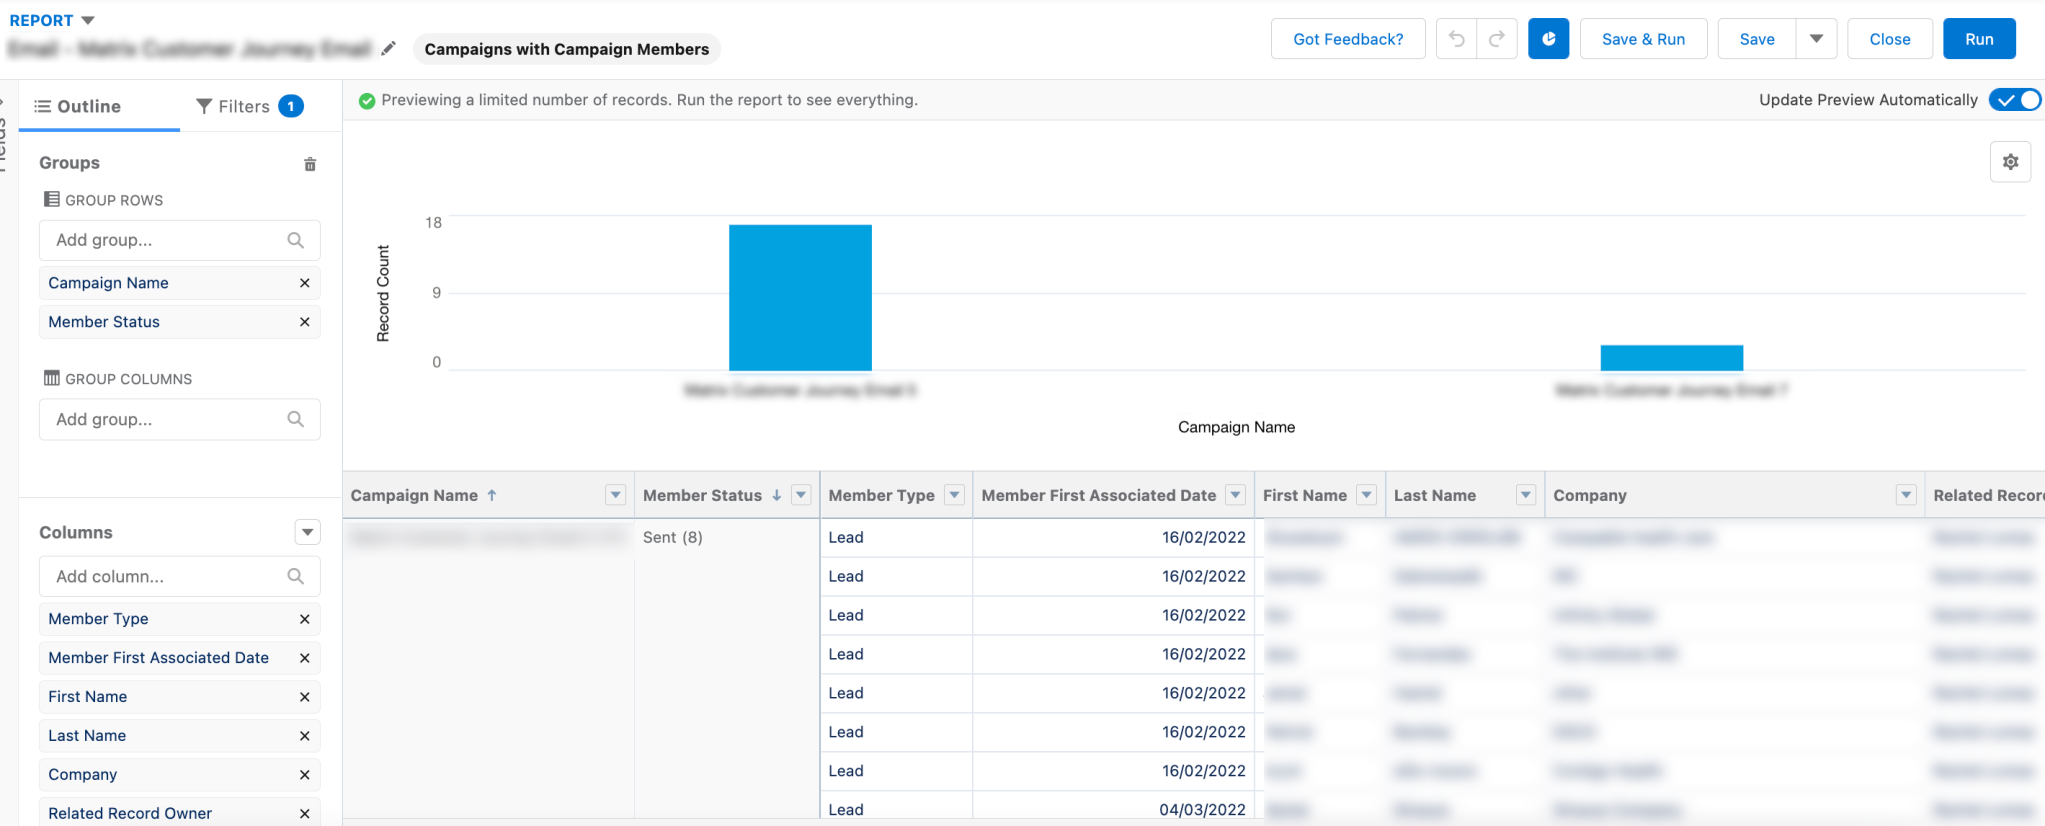 Now you have a report of opens vs. clicks vs. downloads.
Feel free to tweak the format to your liking and add the report to your dashboards. All set!
To get in touch with our team of experts, please drop us a line in the form.
Written by Alon Margovskiy, Head of Marketing Automation, Superdrive.
Superdrive is an official Salesforce Partner with Salesforce Certified Marketing Cloud Specialists and Consultants.


)